Git LFSを試してみる
Git LFSというものを試してみました。
環境はMacのOS 10.12.6です。
Git LFSとは
Git LFSとはGit Large File Storageの略で、大容量ファイルの扱い用のファイルです。
公式サイトは以下になります。
Git LFSを試してみる
brew install git-lfs
gitリポジトリを作ったら、下コマンドで初期化します。
git lfs install
ls .gitでlfsフォルダが作られてる事を確認します。

続けてlfsで管理するファイルを登録します。
下のようにtrackコマンドを使って登録します。
git lfs track "*.png"
これによって、.gitattributesに下のような情報が書き込まれます。
*.png filter=lfs diff=lfs merge=lfs -text
続けて、実際にファイルを保存してみます。
git add image.png
git commit -m "画像の追加"
実際にファイルがlfsで管理されているかどうかはls-filesコマンドで確認できます。
git lfs ls-files

この状態で一回pushします。
git push origin master
github上では、Stored with Git LFSと表示されます。

このリポジトリをZIPでダウンロードして画像ファイルを開くと、image.pngには画像ファイルの参照だけ入っている事が分かります。

ウォーキングによる消費カロリーの計算方法
ウォーキングによる消費カロリーの計算方法について調べてみました。
今回は以下の書類を参考にしました。
運動による消費カロリーの計算式
消費カロリーは以下の式で表されます。
メッツは運動強度の単位で、激しい運動ほど高い値になります。
係数の1.05は、近年は計算簡略化の為に省略される事もあるようです。
消費カロリー(kcal) = メッツx時間(時)x体重(kg)x1.05
ウォーキングのメッツ
各運動のメッツの大きさは下のように分類されています。

ウォーキングの消費カロリーを計算してみる
先程の表を使ってウォーキングの消費カロリーを計算してみます。
体重70kgで、「普通歩行(平地、67m/分、犬を連れて)」を1時間した場合の消費カロリーは下の通りです。
消費カロリー(kcal) = メッツx時間(時)x体重(kg)x1.05
↓
220.5kcal = 3x1x70x1.05
1kmウォーキングした時の消費カロリー
前項では1時間運動した時の消費カロリーを算出しました。
今度は1kmウォーキングした時の消費カロリーを算出します。
今回は「分速67m/分のウォーキング」と仮定しているので、1kmにかかる時間は約15分です。
その為、1km歩く時の消費カロリーは「220.5kcalx1/4≒55.1kcal」となります。
1kmやや早足でウォーキングした時の消費カロリー
最後に、1kmをより早く歩いた場合の消費カロリーも計算してみます。
運動強度は、先程の表の「やや速歩(平地、やや速めに=93m/分)」を使います。
今回は「93m/分」なので、1km歩く為の速度は10.7分ほどになります。
体重を先程同様、70kgだと仮定すると下のような結果になります。
消費カロリー(kcal) = メッツx時間(時)x体重(kg)x1.05
↓
56.4kcal ≒ 4.3x10.7/60x70x1.05
SCLAlertViewでアラート表示をおしゃれにする
SCLAlertViewというライブラリを試してみました。
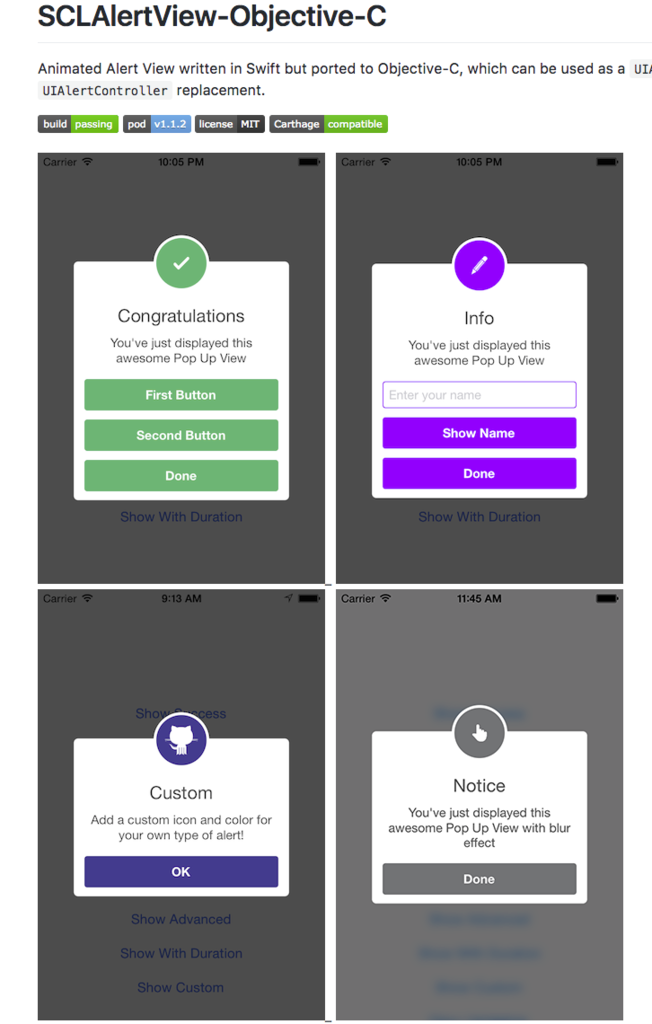
まずはCocoaPodsでインストールします。
target 'MyApp' do
  use_frameworks!

  pod 'SCLAlertView-Objective-C'
end
使い方は下の通りです。
showInfoメソッドで、Infoマーク付きのポップアップを5秒間表示できます。
import UIKit
import SCLAlertView_Objective_C

class ViewController: UIViewController {
    override func viewDidAppear(_ animated: Bool) {
        SCLAlertView().showInfo(
            self, title: "タイトル", subTitle: "サブタイトル", closeButtonTitle: "閉じる", duration: 5.0)
    }
}

自動でポップアップを閉じたくない場合は、durationに0をセットします。
SCLAlertView().showInfo(self, title: "タイトル\n2行目", subTitle: "サブタイトル\n2行目", closeButtonTitle: "閉じる", duration: 0)
サブタイトルは複数行にも対応しています。
SCLAlertView().showInfo(self, title: "タイトル\n2行目", subTitle: "サブタイトル\n2行目\n3行目\n4行目\n5行目\n6行目\n7行目\n8行目\n9行目\n10行目", closeButtonTitle: "閉じる", duration: 0)

Info以外にも、下のようなポップアップに対応しています。
SCLAlertView().showEdit(self, title: "タイトル", subTitle: "サブタイトル", closeButtonTitle: "閉じる", duration: 0)

SCLAlertView().showError(self, title: "タイトル", subTitle: "サブタイトル", closeButtonTitle: "閉じる", duration: 0)

SCLAlertView().showNotice(self, title: "タイトル", subTitle: "サブタイトル", closeButtonTitle: "閉じる", duration: 0)

SCLAlertView().showSuccess(self, title: "タイトル", subTitle: "サブタイトル", closeButtonTitle: "閉じる", duration: 0)

SCLAlertView().showWaiting(self, title: "タイトル", subTitle: "サブタイトル", closeButtonTitle: "閉じる", duration: 0)

SCLAlertView().showQuestion(self, title: "タイトル", subTitle: "サブタイトル", closeButtonTitle: "閉じる", duration: 0)

ボタンやアイコンの色はcustomViewColorで変更する事ができます。
let alert = SCLAlertView()
alert.customViewColor = UIColor.darkGray
alert.showQuestion(self, title: "タイトル", subTitle: "サブタイトル", closeButtonTitle: "閉じる", duration: 0)

テキストフィールドの追加も可能です。
let alert = SCLAlertView()
let textField = alert.addTextField("Text")
alert.showQuestion(self, title: "タイトル", subTitle: "サブタイトル", closeButtonTitle: "閉じる", duration: 0)
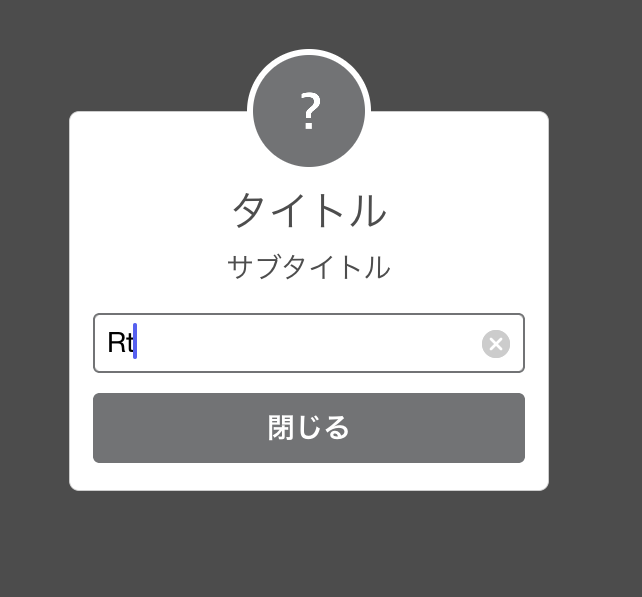
ボタンを追加でセットする事も可能です。
let alert = SCLAlertView()
alert.addButton("ボタン1", actionBlock: {})
alert.addButton("ボタン2", actionBlock: {})
alert.showQuestion(self, title: "タイトル", subTitle: "サブタイトル", closeButtonTitle: "閉じる", duration: 0)
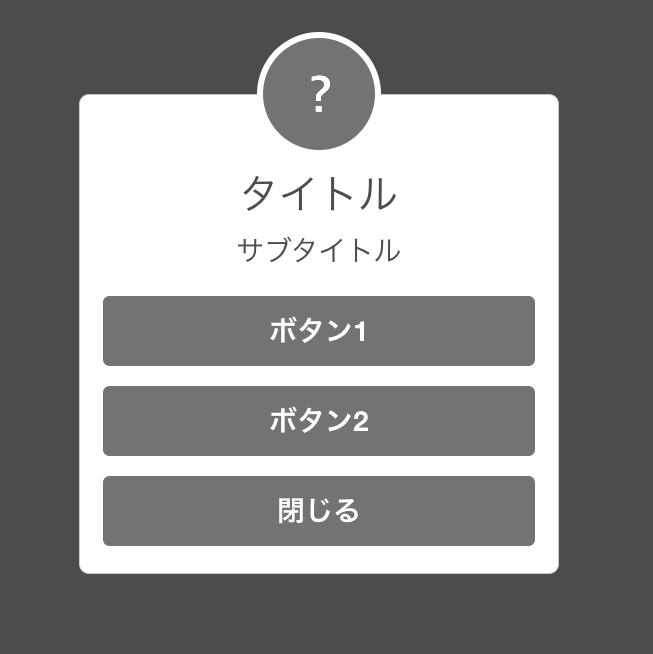
ボタンの文字サイズを変更する事もできます。
let alert = SCLAlertView()
let button = alert.addButton("ボタン1", actionBlock: {})
button?.titleLabel?.font = UIFont.systemFont(ofSize: 10)
alert.showQuestion(self, title: "タイトル", subTitle: "サブタイトル", closeButtonTitle: "閉じる", duration: 0)
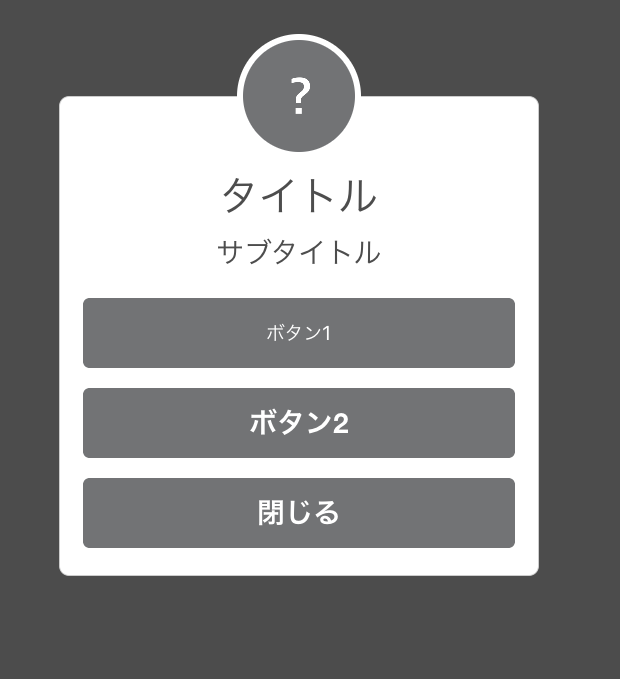
他にも背景を変えたりと様々なカスタマイズができます。
let alert = SCLAlertView()
alert.backgroundType = .blur
alert.showQuestion(self, title: "タイトル", subTitle: "サブタイトル", closeButtonTitle: "閉じる", duration: 0)

Swift版もあるので、良かったら併せてご参照下さい。
なぜIndexPathと配列リテラルは比較できるのか
こちらの記事を読んで、IndexPathをIntの配列リテラルから生成したりIndexPathとInt配列の比較ができる事を知りました。
今回はなぜこのような事ができるかを調べてみました。
[iOS][Swift] IndexPathはInt配列リテラルから作れる。Int配列リテラルとの比較もできる
let indexPath: IndexPath = [0, 0]

if indexPath == [1, 1] {
}
Intの配列リテラルからIndexPathを生成できる理由
Intの配列リテラルからIndexPathを生成できるのは、IndexPathがExpressibleByArrayLiteralプロトコルに準拠しているからでした。
let indexPath: IndexPath = [0, 0]
ExpressibleByArrayLiteralは下のようなもので、配列リテラルをそのクラスに変更する事ができます。
public protocol ExpressibleByArrayLiteral {

    /// The type of the elements of an array literal.
    associatedtype Element

    /// Creates an instance initialized with the given elements.
    public init(arrayLiteral elements: Self.Element...)
}
自作クラスをExpressibleByArrayLiteralに準拠させたらIntの配列リテラルからクラスに変換できるようになりました。
class MyClass: ExpressibleByArrayLiteral {
    typealias Element = Int

    required init(arrayLiteral elements: Int...) {
        print(elements) // → [1, 2, 3]
    }
}
let myValue: MyClass = [1, 2, 3]
IndexPathとInt配列の比較ができる理由
比較できるのは、IndexPathがEquatableに準拠しているからでした。
Equatableは下のようなプロトコルで、準拠するとそのクラス同士の比較ができます。
public protocol Equatable {

    /// Returns a Boolean value indicating whether two values are equal.
    ///
    /// Equality is the inverse of inequality. For any values `a` and `b`,
    /// `a == b` implies that `a != b` is `false`.
    ///
    /// - Parameters:
    ///   - lhs: A value to compare.
    ///   - rhs: Another value to compare.
    public static func ==(lhs: Self, rhs: Self) -> Bool
}
下のように比較演算子を使えるようになります。
class MyClass: Equatable {
    static func ==(lhs: MyClass, rhs: MyClass) -> Bool {
        return true
    }
}
print(MyClass() == MyClass())
これを先程のExpressibleByArrayLiteralと合わせることで、「IndexPath(row: 0, section: 0) == [0, 1]はIndexPath(row: 0, section: 0) == IndexPath(row: 1, section: 0)と同じ意味」 → 「EquatableによってIndexPath同士の比較は可能」→「IndexPathとIntの配列リテラルの比較ができる」となります。
試したところ、自作クラスをInt配列リテラルと比較する事ができました。
class MyClass: ExpressibleByArrayLiteral, Equatable {
    typealias Element = Int

    required init(arrayLiteral elements: Int...) {
        print(elements)
    }

    static func ==(lhs: MyClass, rhs: MyClass) -> Bool {
        return true
    }
}

let myValue: MyClass = [1, 2, 3]

print(myValue == [1, 2, 3])
switch myValue {
case [1, 1]: break
default: break
}
iOS11からWebViewのスクロール減速スピードが変わった気がするので調査
iOS11ではWebViewのスクロールがスムーズになった気がするので調査してみました。
調査対象はWKWebViewとUIWebViewです。
各OSで、スクロールの減速スピードを表すdecelerationRateの値を比較してみました。
この値が小さいほど、スクロールが早く停止します。
import WebKit

print(WKWebView().scrollView.decelerationRate)
print(UIWebView().scrollView.decelerationRate)
print(UIScrollView().decelerationRate)
結果
結果は下の通りです。
やはりiOS11からスクロールの減速スピードが変わっていたようです。
| WKWebView | UIWebView | UIScrollView | |
|---|---|---|---|
| iOS9 | 0.9893243312 | 0.9893243312 | 0.998 |
| iOS10 | 0.9893243312 | 0.9893243312 | 0.998 |
| iOS11 | 0.998 | 0.998 | 0.998 |
decelerationRateにセットできる値
余談ですが、スクロールのdecelerationRateにセットできる値は限られているようです。
試したところ0.99か0.998しかセットできませんでした。
let webView = UIWebView()
print(webView.scrollView.decelerationRate) // → 0.998
webView.scrollView.decelerationRate = 0.1
print(webView.scrollView.decelerationRate) // → 0.99
webView.scrollView.decelerationRate = 0.999
print(webView.scrollView.decelerationRate) // → 0.998
webView.scrollView.decelerationRate = 0.994
print(webView.scrollView.decelerationRate) // → 0.998
webView.scrollView.decelerationRate = 0.993
print(webView.scrollView.decelerationRate) // → 0.99
webView.scrollView.decelerationRate = 0.989
print(webView.scrollView.decelerationRate) // → 0.99
CoreImageのフィルターを試してみる(CICategoryBlur)
CoreImageを使うと、簡単に画像にフィルターをかける事ができます。
今回はCoreImageで用意されているフィルターをいくつか試してみました。
元画像は下のものです、画像はぱくたそ様のものを使っています。

import UIKit

class ViewController: UIViewController {
    let imageView = UIImageView(image: #imageLiteral(resourceName: "image"))

    override func viewDidLoad() {
        super.viewDidLoad()

        imageView.frame = CGRect(
            x: (view.frame.width - #imageLiteral(resourceName: "image").size.width) / 2, y: 20,
            width: #imageLiteral(resourceName: "image").size.width, height: #imageLiteral(resourceName: "image").size.height)
        view.addSubview(imageView)
    }
}
今回試すフィルター
今回はCICategoryBlurというカテゴリーのフィルターを試します。
一覧は下のものです。
CIBoxBlur
CIDiscBlur
CIGaussianBlur
CIMaskedVariableBlur
CIMedianFilter
CIMotionBlur
CINoiseReduction
CIZoomBlur
一覧の取得は以下メソッドで行いました。
CIFilter.filterNames(inCategory: kCICategoryBlur)
結果
フィルターの適用は下のように行いました。
CIFilterのフィルターに渡す引数でフィルターを切り替える事ができます。
let filter = CIFilter(name: "CIBoxBlur")
let ciImage = CIImage(image: #imageLiteral(resourceName: "image"))
filter?.setValue(ciImage, forKey: kCIInputImageKey)
if let filteredImage = filter?.outputImage {
    imageView.image = UIImage(ciImage: filteredImage)
}
CIBoxBlur

CIDiscBlur

CIGaussianBlur

CIMaskedVariableBlur
こちらはマスク画像が必要です。
マスク画像の、白い部分にブラーがかかります。
今回は下のようなマスク画像を用意しました。

import UIKit
import CoreImage

class ViewController: UIViewController {
    let imageView = UIImageView(image: #imageLiteral(resourceName: "image"))
    var timer: Timer?

    override func viewDidLoad() {
        super.viewDidLoad()

        imageView.frame = CGRect(
            x: (view.frame.width - #imageLiteral(resourceName: "image").size.width) / 2, y: 20,
            width: #imageLiteral(resourceName: "image").size.width, height: #imageLiteral(resourceName: "image").size.height)
        view.addSubview(imageView)

        let filter = CIFilter(name: "CIMaskedVariableBlur")
        let ciImage = CIImage(image: #imageLiteral(resourceName: "image"))
        filter?.setValue(ciImage, forKey: kCIInputImageKey)
         filter?.setValue(CIImage(image: #imageLiteral(resourceName: "image2")), forKey: "inputMask")
        if let filteredImage = filter?.outputImage {
            imageView.image = UIImage(ciImage: filteredImage)
        }
    }
}

CIMedianFilter

CIMotionBlur

CINoiseReduction

CIZoomBlur

まとめ
フィルター一覧や各フィルターに渡せるパラメータは下ドキュメントから確認できます。
Swift3でクラス名が重複した場合の対処法
Swift3では様々なクラス名のプレフィックスがなくなり、NSUserDefaults→UserDefaultsなどのようにクラス名が変更になりました。
今回は、その影響で自分の定義したクラス名と標準クラス名が被った場合の対処法について記載します。
例えばUserDefaultsではFoundationを先頭に付けることでFoundationのUserDefaultsクラスを呼び出せます。
_ = UserDefaults()
_ = Foundation.UserDefaults() // FoundationのUserDefaultsを呼び出し

class UserDefaults {
    // 省略
}
IntやStringはSwiftを先頭に付ける事で呼び出しができます。
_ = Swift.Int()
_ = Swift.String()
UIKitのクラスはUIKitで呼び出し可能です。
UIKit.UITableView()
逆に自分のプロジェクト内のクラスを呼びたい時は、プロジェクト名を先頭に付けます。
MyApp.MyClass()