Embedded binary is not signed with the same certificate as the parent appエラーの対処法
iOSアプリ開発で下のエラーが出たので対処しました。
エラーは実機検証のときのみ発生して、シミュレータでは発生しませんでした。
エラーを見た所アプリ本体とWidget Extensionの証明書が違うとの事です。
error: Embedded binary is not signed with the same certificate as the parent app. Verify the embedded binary target's code sign settings match the parent app's.

        Embedded Binary Signing Certificate:    Not Code Signed
        Parent App Signing Certificate:     Apple Development: XXX
今回の原因はウィジェットのExcluded Architectureにarm64に入れていた事でした。

arm64は下のようにシミュレータだけに入れる必要があります。
arm64はスマホで使われるアーキテクチャなので、これを除外することでウィジェットの実機ビルドがうまくいかなかったのかと思われます。

調べた所signing & capabilitiesのTermを選択していない時にもこのエラーは出るようです。
その場合は正しいTermを選択すれば解消できます。

MacBook Pro 2021でのビルド時間測定
MacBook Proを買い替えたのでXcodeでのビルド時間やAdobe Premiereなどでの動画書き出し時間を比較してみました。
新旧マシンのスペックは下の通りです。
ビルド時間を短くしたかったので、どちらもスペック高めのものを購入しました。
■ 新MacBook Pro
MacBook Pro 2021 16インチ
CPU、GPU…Apple M1 Max(10コアCPU、32コアGPU、16コアNeural Engine搭載)
メモリ…64GBユニファイドメモリ
■ 旧MacBook Pro
MacBook Pro 2019 16インチ
CPU…第9世代の2.4GHz 8コアIntel Core i9プロセッサ(Turbo Boost使用時最大5.0GHz)
GPU… AMD Radeon Pro 5500M(8GB GDDR6メモリ搭載)
メモリ…32GB 2,666MHz DDR4メモリ
比較1 Xcodeでプロジェクトのビルド1
XcodeでiPhoneアプリのClean後のビルド時間を測定しました。
プロジェクトはSwiftファイルが100ファイルほどでCocoaPodsでライブラリ20個程入れています。
3回測定して平均を計算しました。
()内は各ビルド時間です。
旧…69.1秒(71.2秒、69.7秒、66.3秒) 新…41.0秒(39.9秒、38.5秒、44.6秒)
ビルド時間は40.7%削減。
比較2 Xcodeでプロジェクトのビルド2
別のプロジェクトでも試してみました。
こちらはファイル数は150くらいでライブラリは20個ほど入れています。
旧…147.5秒(148.8秒、145.2秒、148.4秒) 新…45.7秒(45.7秒、45.4秒、46.1秒)
ビルド時間は69.0%削減。
比較3 Adobe Premiereで動画書き出し
動画の書き出しも試してみました。
40分くらいの動画でエフェクトはほぼないです。
出力形式はH.264でプリセットYoutube 2160p 54K Ultra HDを選択しました。
旧…37分17秒(38分47秒、38分36秒、34分29秒) 新…6分9秒(6分5秒、05分54秒、6分28秒)
書き出し時間85.8%削減。
まとめ
計測してみましたがビルド時間がかなり改善したので購入して良かったと思います。
動画についてはここまで差が出ると思ってなかったので驚きました。
UIDatePickerのdatePickerModeをcountDownTimerにした時の挙動確認
今回はUIDatePickerのdatePickerModeをcountDownTimerに変えた時の挙動を見てみました。
まずはdatePickerModeに何もセットしない場合の挙動を見ます。
プロジェクトをViewControllerを作って下のように変更します。
class ViewController: UIViewController {
    override func viewDidLoad() {
        super.viewDidLoad()

        let picker = UIDatePicker()
        picker.center = view.center
        view.addSubview(picker)
    }
}
下のようにデフォルトのDatePickerが表示されます。

変更時のイベントの受け取り処理は下のとおりです。
class ViewController: UIViewController {
    override func viewDidLoad() {
        super.viewDidLoad()

        let picker = UIDatePicker()
        picker.center = view.center
        view.addSubview(picker)
        picker.addTarget(self, action: #selector(self.datePickerValueChanged(sender:)), for: .valueChanged)
    }

    @objc func datePickerValueChanged(sender: UIDatePicker) {
        let dateFormatter = DateFormatter()
        dateFormatter.dateFormat = "yyyy/MM/dd HH:mm"
        print(dateFormatter.string(from: sender.date))
    }
}
変更してから日付を変更するとコンソールに変更後の日付が出てきます。

今回はこのUIDatePickerのdatePickerModeをcountDownTimerにした時の動作を確認します。
picker.datePickerMode = .countDownTimer
変更すると下のような表示になります。

試しに数字を10時間6分に変えたら下のような表示になりました。
おそらくDatePickerのdateは当日の選択時間になるのかと思います。

次はPickerに現在の日時(19時40分)をセットしてみました。
picker.date = Date()
セットしたら下のように現在の時間と同じ時間になりました。

Storyboard+UIScrollView+AutoLayoutでhas ambiguous scrollable contentエラーが出ないようにする
Storyboard上でUIScrollView+AutoLayoutを使うと下のようなエラーが出る事があります。
今回はその対処法を調べました。
Xcodeのバージョンは13です。

参考にしたのは下URLです。
まずはプロジェクトを作ってMain.storyboardにUIScrollViewを配置します。
今回はUIScrollViewを縦にだけスクロールするようにしようと思います。

配置したらUIScrollViewに下のような制約を追加します。

制約を追加すると下のようにエラーになり線が赤くなります。

エラー対策の為、まずはUIViewをUIScrollViewの直下に配置します。

次に左側のメニューでViewとContent Layout Guideを選びます。

この状態で下のような制約を追加します。

続けてViewにHeightの制約を追加します。

これでyやheightに関するエラーは消えました。

次はxとwidthに関するエラーの対応をします。
今度はViewとFrame Layout Guideを選びます。

この状態でEqual Widthsの制約を追加します。

これでエラーが消えました。
実行するとスクロールのContentHeightが1000になっている事がわかります。

先程出てきたContent Layout GuideとFrame Layout Guideですが公式サイトに説明がありました。
https://developer.apple.com/documentation/uikit/uiscrollview/2865870-contentlayoutguide
https://developer.apple.com/documentation/uikit/uiscrollview/2865772-framelayoutguide
公式サイトの説明は下の通りです。
要するにContent Layout GuideはUIScrollViewのcontentSizeに関するガイドでFrame Layout GuideはUIScrollViewのframeに関するガイドです。
そのためFrame Layout GuideとViewにEqualWidthsを付ければcontentSize.widthがUIScrollViewのframe.widthと等しくなったのだと思われます。
■ Content Layout Guide
Use this layout guide when you want to create Auto Layout constraints related to the content area of a scroll view.
■ Frame Layout Guide
Use this layout guide when you want to create Auto Layout constraints that explicitly involve the frame rectangle of the scroll view itself, as opposed to its content rectangle.
続けてContentHeightを動的に変える方法についても見ていきます。
まずはViewControllerにNSLayoutConstraintのIBOutletを作ります。
class ViewController: UIViewController {
    @IBOutlet var constraint: NSLayoutConstraint!
}
Storyboardから今作ったIBOutletとHeightに関するNSLayoutConstraintを紐付けます。

あとはNSLayoutConstraintの値を変えればContentHeightの値が変わります。
class ViewController: UIViewController {
    @IBOutlet var constraint: NSLayoutConstraint!

    override func viewDidLoad() {
        super.viewDidLoad()

        constraint.constant = 2000
    }
}
Android StudioのCPU Profilerで重い箇所を特定する
下URLを参考にCPU Profilerを試してみました。
まずは新規プロジェクトを作成します。

Profiler画面は[View] > [Tool Windows] > [Profiler]と選択することで表示できます。
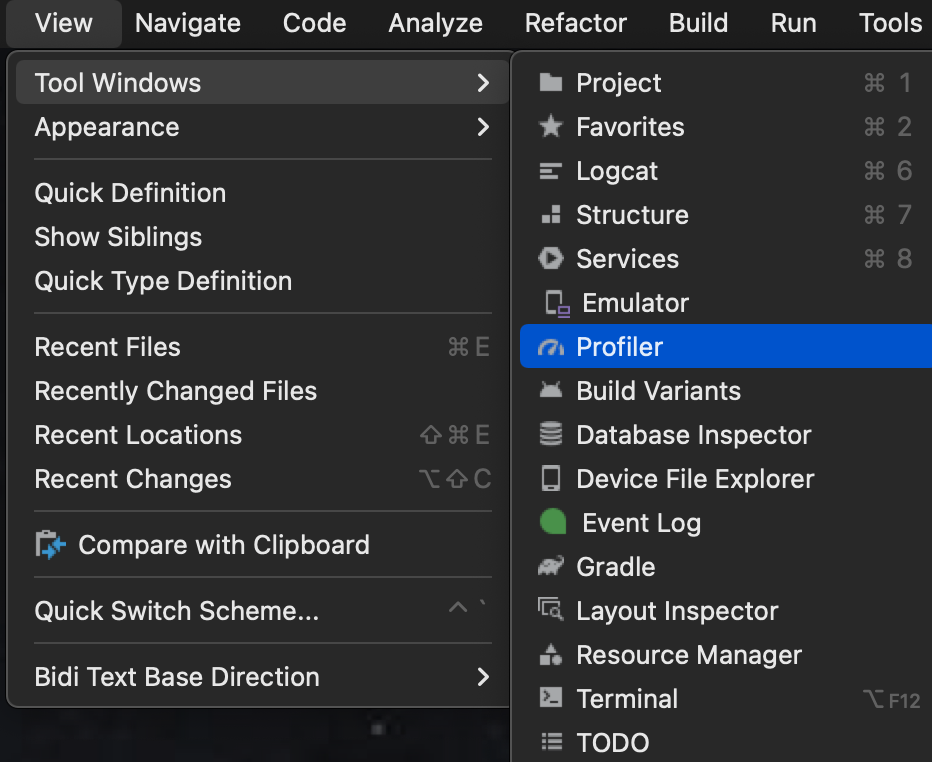
画面は最初は下のようになっています。

アプリを立ち上げると自動で測定開始してくれます。

測定しない場合、左上の+ボタンからセッションを選択します。

CPUを押すとCPU利用状況についてより詳しく見れるようになります。

より詳しく見たい場合、真ん中上部のRecordボタンで測定します。
測定停止したい所でStopボタンを押します。

Stopボタンを押すと下のように詳しく見れる画面に移動します。

テスト用に下のような重い処理を追加します。
view.findViewById<Button>(R.id.button_first).setOnClickListener {
    (0..100000).forEach { i ->
        (0..10000).forEach { j ->
            val r = i.toFloat() * j.toFloat()
        }
    }
    findNavController().navigate(R.id.action_FirstFragment_to_SecondFragment)
}
上を追加して測定した結果は下の通りです。

右側の画面でTop Downタブを開くと具体的にどの処理が重いかまでを追いかける事ができます。

StoreKit2のサンプルコードを動かしてみる
今回は下URLからダウンロードできるStoreKit2のサンプルコードを動かしてみました。
StoreKit2は旧来のStoreKitを改良したもので、シンプルなコードで購入処理が記述できるようになっています。
ただしiOS15限定以上なので利用する際はアプリの対象OSを15以上にするか旧StoreKitと併用する必要があります。
StoreKit2の処理
商品情報の取得方法は下の通りです。
こちらはサンプルコードを少し分かりやすく改変したものになります。
StoreKit2ではawaitを使う事でブロックやDelegateを使わずに取得できるようになりました。
let products = try? await Product.products(for: ["com.example"])
購入処理下の通りです。
purchaseメソッドだけで購入できるので今までに比べて非常に楽になりそうです。
戻り値の型はVerificationResult
func purchase(_ product: Product) async throws -> Transaction? {
    //Begin a purchase.
    let result = try await product.purchase()

    switch result {
    case .success(let verification):
        let transaction = try checkVerified(verification)

        //Deliver content to the user.
        await updatePurchasedIdentifiers(transaction)

        //Always finish a transaction.
        await transaction.finish()

        return transaction
    case .userCancelled, .pending:
        return nil
    default:
        return nil
    }
}

func checkVerified<T>(_ result: VerificationResult<T>) throws -> T {
    //Check if the transaction passes StoreKit verification.
    switch result {
    case .unverified:
        //StoreKit has parsed the JWS but failed verification. Don't deliver content to the user.
        throw StoreError.failedVerification
    case .verified(let safe):
        //If the transaction is verified, unwrap and return it.
        return safe
    }
}
過去の購入情報はTransactionのlatestメソッドで取得する事ができます。
購入時同様、VerificationResult
func isPurchased(_ productIdentifier: String) async throws -> Bool {
    //Get the most recent transaction receipt for this `productIdentifier`.
    guard let result = await Transaction.latest(for: productIdentifier) else {
        //If there is no latest transaction, the product has not been purchased.
        return false
    }

    let transaction = try checkVerified(result)

    //Ignore revoked transactions, they're no longer purchased.

    //For subscriptions, a user can upgrade in the middle of their subscription period. The lower service
    //tier will then have the `isUpgraded` flag set and there will be a new transaction for the higher service
    //tier. Ignore the lower service tier transactions which have been upgraded.
    return transaction.revocationDate == nil && !transaction.isUpgraded
}

func checkVerified<T>(_ result: VerificationResult<T>) throws -> T {
    //Check if the transaction passes StoreKit verification.
    switch result {
    case .unverified:
        //StoreKit has parsed the JWS but failed verification. Don't deliver content to the user.
        throw StoreError.failedVerification
    case .verified(let safe):
        //If the transaction is verified, unwrap and return it.
        return safe
    }
}
まとめ
簡単に動かしてみましたが従来に比べて処理がシンプルになりそうで良かったです。
シンプルんになっただけでなく返金対応が増えていたり継続課金の検証が簡単だったりするようなので実際に使う時は更に詳しく調べていきたいと思いました。
ShazamKitで音声認識を試してみる
下の記事を参考にShazamKitを動かしてみました。
ShazamKitは音楽認識ライブラリで、マイク経由で曲を渡すと曲名を出してくれたりします。
ShazamKitのiOS15から登場したライブラリで、SDKはAndroidでも使えるようです。
初期設定
まずは使いたいアプリのBundleIDのShazamKitを有効化します。
AppleのMemberCenterにアクセスしてShazamKitを使いたいBundleIDを登録してから「App Services」にあるShazamKitにチェックを入れて保存します。

実装
新規にプロジェクトを作成します。
BundleIDは先程登録したIDを使います。

音声認識の際にマイクを使うので、Info.plistにNSMicrophoneUsageDescriptionを追加してマイクを使う理由を記述します。

まずはマイクの音を取り込む実装をします。
ViewControllerを下のように修正します。
class ViewController: UIViewController {
    let engine = AVAudioEngine()

    override func viewDidLoad() {
        super.viewDidLoad()

        let audioSession = AVAudioSession.sharedInstance()
        try? audioSession.setCategory(.record)
        try? audioSession.setActive(true, options: .notifyOthersOnDeactivation)

        let inputNode = engine.inputNode
        try? engine.start()
    }
}
起動するとマイクの音声を読み取る事ができるようになります。

次は読み取った音声を元に曲名を調べる実装をします。
ViewControllerを下のように変更します。
import UIKit
import ShazamKit

class ViewController: UIViewController {
    let session = SHSession() // 追加
    let engine = AVAudioEngine()

    override func viewDidLoad() {
        super.viewDidLoad()

        let audioSession = AVAudioSession.sharedInstance()
        try? audioSession.setCategory(.record)
        try? audioSession.setActive(true, options: .notifyOthersOnDeactivation)

        let inputNode = engine.inputNode
        try? engine.start()

        // ここから追加
        session.delegate = self
        let format = inputNode.outputFormat(forBus: .zero)
        inputNode.installTap(onBus: .zero, bufferSize: 1024, format: format) { buffer, _ in
            self.session.matchStreamingBuffer(buffer, at: nil)
        }
    }
}

extension ViewController: SHSessionDelegate {
    func session(_ session: SHSession, didFind match: SHMatch) {
        print(#function)
        print(match.mediaItems)
    }

    func session(_ session: SHSession, didNotFindMatchFor signature: SHSignature, error: Error?) {
        print(#function)
        print(error)
    }
}
音声をShazamKitにわたす処理は下の箇所で行っています。
inputNode.installTap(onBus: .zero, bufferSize: 1024, format: format) { buffer, _ in
    self.session.matchStreamingBuffer(buffer, at: nil)
}
読み取り成功時や失敗時はSHSessionDelegateのメソッドが呼ばれます。
extension ViewController: SHSessionDelegate {
    func session(_ session: SHSession, didFind match: SHMatch) {
        print(#function)
        print(match.mediaItems)
    }

    func session(_ session: SHSession, didNotFindMatchFor signature: SHSignature, error: Error?) {
        print(#function)
        print(error)
    }
}
曲を流すと下のように正しく曲が認識されました。

日本の曲も試した所、正しく認識する事ができました。
