しめ鯖日記

swift, iPhoneアプリ開発, ruby on rails等のTipsや入門記事書いてます

【Swift】TwitterKitでアプリから投稿してみる

iOS11からはSocial.frameworkによるツイートができなくなり、代わりにTwitterKitが推奨されています。
今回はTwitterKitを使って投稿する方法を試してみます。

iOS11でSocial.frameworkを使った時の挙動

下のようにテキストをツイートする実装をしました。

import UIKit
import Social

class ViewController: UIViewController {
    override func viewDidAppear(_ animated: Bool) {
        super.viewDidAppear(animated)
        
        let c = SLComposeViewController(forServiceType: SLServiceTypeTwitter)!
        c.setInitialText("ついーと")
        present(c, animated: true, completion: nil)
    }
}

上のコードを動かしたところ、無事に投稿する事ができました。
もしかすると、iOS10以前でTwitter連携したセッションが残っていたのかもしれません。

iOS11のシミュレータで上を試したら、画面に何も表示されませんでした。

TwitterKitで投稿する

準備

最初にTwitterのDeveloperページでアプリを登録します。

https://dev.twitter.com/index

アプリを作ったら、ConsumerKeyとConsumerSecretを取得します。
それを使って以下のようにTwitterKitを初期化します。

Twitter.sharedInstance().start(withConsumerKey: "XXXXX", consumerSecret: "XXXXX")

次にCocoaPodsでTwitterKitをインストールします。

target 'MyApp' do
  use_frameworks!

  pod 'TwitterKit'
end

続けてAppDelegateに下のようなメソッドを追加します。

func application(_ app: UIApplication, open url: URL, options: [UIApplicationOpenURLOptionsKey : Any] = [:]) -> Bool {
    if Twitter.sharedInstance().application(app, open: url, options: options) {
        return true
    }
    return true
}

最後にInfo.plistを修正します。
LSApplicationQueriesSchemesにTwitterのスキーマを登録してください。

f:id:llcc:20170916151728p:plain

Info.plistのURL typesにも値をセットします。
XXXXXのところは、自分のConsumerKeyを入れます。

f:id:llcc:20170916151743p:plain

ログイン周り

ログインしているかどうかはhasLoggedInUsersメソッドで確認します。

if Twitter.sharedInstance().sessionStore.hasLoggedInUsers() {
}

ログインはlogInメソッドで行う事ができます。

Twitter.sharedInstance().logIn { success, error in
    print(success)
    print(error)
}

ユーザーがTwitterアプリをインストールしてない場合は下のようなエラーになります。

Desktop applications only support the oauth_callback value 'oob'

投稿する

投稿処理は以下の通りです。
Social.framework同様に画像やURLの添付もできます。

let composer = TWTRComposer()
composer.setText("てきすと")
composer.show(from: self) { result in
    if (result == .done) {
        print("OK")
    } else {
        print("NG")
    }
}

CoreImageのフィルターを試してみる(CICategoryColorAdjustment、その2)

下の続きになります。

www.cl9.info

今回もCoreImageのフィルターを使って画像加工を実装していきます。
フィルターはCICategoryColorAdjustmentのCIColorPolynomial以降を見ていきます。

https://developer.apple.com/library/content/documentation/GraphicsImaging/Reference/CoreImageFilterReference/index.html#//apple_ref/doc/filter/ci/CIColorPolynomial

実装は下の通りです。
画像は今回もぱくたそ様のものを利用させて頂きました。

import UIKit
import CoreImage

class ViewController: UIViewController {
    let imageView = UIImageView(image: #imageLiteral(resourceName: "image"))
    
    override func viewDidLoad() {
        super.viewDidLoad()
        
        imageView.frame = CGRect(
            x: (view.frame.width - #imageLiteral(resourceName: "image").size.width) / 2, y: 20,
            width: #imageLiteral(resourceName: "image").size.width, height: #imageLiteral(resourceName: "image").size.height)
        view.addSubview(imageView)
        
        // フィルターをかける
//        let filter = CIFilter(name: "CIBoxBlur")
//        let ciImage = CIImage(image: #imageLiteral(resourceName: "image"))
//        filter?.setValue(ciImage, forKey: kCIInputImageKey)
//        if let filteredImage = filter?.outputImage {
//            imageView.image = UIImage(ciImage: filteredImage)
//        }
    }
}

f:id:llcc:20170915144821p:plain

CIColorPolynomial

CIColorPolynomialは3次多項式を追加する事で色の変更を行うようです。
説明だけでは分からなかったので実際に試してみたいと思います。

フィルターは、下のような値をセットする事ができます。
各色のデフォルト値はCIVector(x: 0, y: 1, z: 0, w: 0)です。

let filter = CIFilter(name: "CIColorPolynomial")
let ciImage = CIImage(image: #imageLiteral(resourceName: "image"))
filter?.setValue(ciImage, forKey: kCIInputImageKey)
filter?.setValue(CIVector(x: 0, y: 1, z: 0, w: 0), forKey: "inputRedCoefficients")
filter?.setValue(CIVector(x: 0, y: 1, z: 0, w: 0), forKey: "inputGreenCoefficients")
filter?.setValue(CIVector(x: 0, y: 1, z: 0, w: 0), forKey: "inputBlueCoefficients")
filter?.setValue(CIVector(x: 0, y: 1, z: 0, w: 0), forKey: "inputAlphaCoefficients")
if let filteredImage = filter?.outputImage {
    imageView.image = UIImage(ciImage: filteredImage)
}

inputRedCoefficientsの値を色々変更してみました。
まずはxを0から1に変更しました。

filter?.setValue(CIVector(x: 1, y: 1, z: 0, w: 0), forKey: "inputRedCoefficients")

かなり強い赤になりました。

f:id:llcc:20170915145929p:plain

続けてzを1にします。

filter?.setValue(CIVector(x: 0, y: 1, z: 1, w: 0), forKey: "inputRedCoefficients")

先程よりは弱めの赤になりました。

f:id:llcc:20170915150008p:plain

wを1にした場合も弱めの赤になりました。

f:id:llcc:20170915150108p:plain

逆にyを0にすると、赤が消えて青っぽい画像になりました。

filter?.setValue(CIVector(x: 0, y: 0, z: 0, w: 0), forKey: "inputRedCoefficients")

f:id:llcc:20170915150204p:plain

CIExposureAdjust

こちらは露光の調整をしてくれるフィルターです。
inputEVの値を1にする事で、明るい写真になります。

let filter = CIFilter(name: "CIExposureAdjust")
let ciImage = CIImage(image: #imageLiteral(resourceName: "image"))
filter?.setValue(ciImage, forKey: kCIInputImageKey)
filter?.setValue(1.0, forKey: "inputEV")
if let filteredImage = filter?.outputImage {
    imageView.image = UIImage(ciImage: filteredImage)
}

f:id:llcc:20170915150356p:plain

CIGammaAdjust

画像のガンマ値を調整する機能です。
inputPowerという値をセットして色を調整します。

ドキュメントによると、inputPowerはpow(s.rgb, vec3(power))という式で適用されます。
つまり下のように1より大きい値を入れると色がかなり暗くなります。

let filter = CIFilter(name: "CIGammaAdjust")
let ciImage = CIImage(image: #imageLiteral(resourceName: "image"))
filter?.setValue(ciImage, forKey: kCIInputImageKey)
filter?.setValue(5, forKey: "inputPower")
if let filteredImage = filter?.outputImage {
    imageView.image = UIImage(ciImage: filteredImage)
}

f:id:llcc:20170915151114p:plain

CIHueAdjust

色相を調整するフィルターです。
inputAngleに角度を入れる事で調整できます。

inputAngleの単位はラジアンで、下の場合は真逆の色相に変換しています。

let filter = CIFilter(name: "CIHueAdjust")
let ciImage = CIImage(image: #imageLiteral(resourceName: "image"))
filter?.setValue(ciImage, forKey: kCIInputImageKey)
filter?.setValue(3.14, forKey: "inputAngle")
if let filteredImage = filter?.outputImage {
    imageView.image = UIImage(ciImage: filteredImage)
}

f:id:llcc:20170915151724p:plain

iPhone Xの顔認証(FaceID)の実装、iPhoneシミュレータでの検証方法を調べてみる(Swift)

iPhone Xから顔認証が使えるようになったので、実装方法を調べてみました。

顔認証(FaceID)の実装方法(Swift)

実装自体は指紋認証と全く同じです。
下のようにLAContextのevaluatePolicyで認証を呼び出します。

import UIKit
import LocalAuthentication

class ViewController: UIViewController {
    override func viewDidLoad() {
        super.viewDidLoad()
        
        let context = LAContext()
        var error: NSError?
        if context.canEvaluatePolicy(.deviceOwnerAuthenticationWithBiometrics, error: &error) {
            context.evaluatePolicy(.deviceOwnerAuthenticationWithBiometrics, localizedReason: "テスト認証") { success, error in
                print(success)
            }
        }
    }
}

【iOS】指紋認証を使ってみる - しめ鯖日記

実装は同じなのですが、顔認証を使う際はInfo.plistにNSFaceIDUsageDescriptionを追加する必要があります。

f:id:llcc:20180704215345p:plain

これを追加しないと下のようなエラーが発生します。

This app has crashed because it attempted to access privacy-sensitive data without a usage description.  The app's Info.plist must contain an NSFaceIDUsageDescription key with a string value explaining to the user how the app uses this data.

キーをセットすれば下のように権限を求めるポップアップが出るようになります。

f:id:llcc:20180704215355p:plain

顔認証をシミュレータで検証する

顔認証ですがiPhoneシミュレータで検証することもできます。
シミュレータで使うためには、メニューのHardwareのFace IDでEnrolledにチェックを入れる必要があります。

f:id:llcc:20180704215259p:plain

チェックを入れると下のようにシミュレータで顔認証を求める表示が出ます。

f:id:llcc:20180704215550p:plain

顔認証の成功・失敗はシミュレータのメニューのHardwareのFace IDで選択します。

f:id:llcc:20180704215600p:plain

顔認証(Face ID)対応端末かどうかを判定する

Face IDに対応しているかどうかはLAContextのbiometryTypeを使います。

let context = LAContext()
var error: NSError?
if context.canEvaluatePolicy(.deviceOwnerAuthenticationWithBiometrics, error: &error) {
    if context.biometryType == .faceID {
    }
}

biometryTypeの型はLABiometryTypeというenumで、タッチIDかFaceIDかの判定を行う事ができます。

public enum LABiometryType : Int {

    /// The device does not support biometry.
    @available(iOS 11.2, *)
    case none

    /// The device does not support biometry.
    @available(iOS, introduced: 11.0, deprecated: 11.2, renamed: "LABiometryType.none")
    public static var LABiometryNone: LABiometryType { get }

    /// The device supports Touch ID.
    case touchID

    /// The device supports Face ID.
    case faceID
}

【Swift】present時のアニメーションを変更する

下のように、UIViewControllerをpresentした時の挙動を変更してみました。

present(UIViewController(), animated: true, completion: nil)

present時のアニメーションですが、デフォルトでは下の4つが用意されています。

public enum UIModalTransitionStyle : Int {
    case coverVertical
    case flipHorizontal
    case crossDissolve
    @available(iOS 3.2, *)
    case partialCurl
}

下のように、UIViewControllerを2つ作って動きを確認してみました。

class ViewController1: UIViewController {
    override func viewDidLoad() {
        super.viewDidLoad()
        
        view.backgroundColor = UIColor.lightGray.withAlphaComponent(0.5)
        navigationItem.leftBarButtonItem = UIBarButtonItem(title: "遷移", style: .plain, target: self, action: #selector(self.showViewController2))
    }
    
    func showViewController2() {
        let vc = ViewController2()
        vc.modalTransitionStyle = .crossDissolve
        present(vc, animated: true, completion: nil)
    }
}

class ViewController2: UIViewController {
    override func viewDidLoad() {
        super.viewDidLoad()
        
        view.backgroundColor = UIColor.blue.withAlphaComponent(0.5)
    }
}

f:id:llcc:20170913145852p:plain

coverVertical

modalTransitionStyleでデフォルトで指定されているアニメーションです。
表示する画面が、下から出てきます。

f:id:llcc:20170913150017g:plain

わかり易さのためにアニメーション速度を落として遷移しています。

flipHorizontal

ビューが回転して出てくるアニメーションです。

f:id:llcc:20170913150059g:plain

crossDissolve

今表示されている画面がフェードアウトしていき、次に表示する画面が段々フェードインするアニメーションです。

f:id:llcc:20170913150146g:plain

partialCurl

紙のページをめくるようなアニメーションです。

f:id:llcc:20170913150300g:plain

【Swift】App Groupを使ってアプリ間でファイル共有

App Groupという仕組みを使って、アプリ同士のファイル共有を試してみました。
ちなみにApp Groupは自分が開発したアプリ間でないとデータ共有できないので注意が必要です。

下記事ではUserDefaultsの共有を試したので、今回はファイル共有を試してみようと思います。

www.cl9.info

テキストの共有

前回同様、まずはプロジェクトを2つ作成します。

f:id:llcc:20170912143059p:plain

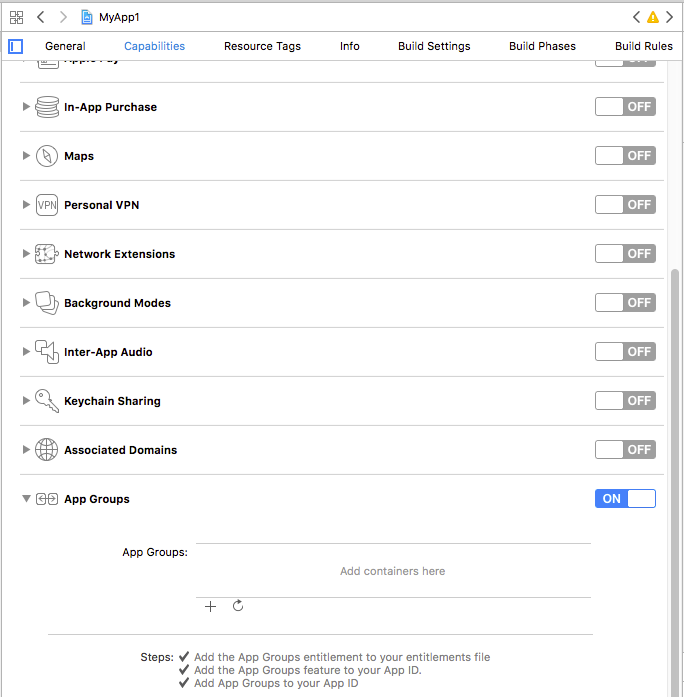
次にそれぞれのプロジェクトのCapabilitiesからAppGroupをONにします。

f:id:llcc:20170912143107p:plain

有効化したら新しいApp Groupを作成します。
+ボタンから、AppGroupを追加してください。

f:id:llcc:20170912143113p:plain

これでAppGroupを使う準備が完了しました。
次は共有処理を書いていきます。

まずは片方のアプリからデータ保存します。
MyApp1のAppDelegate.swiftを以下のようにして下さい。

import UIKit

@UIApplicationMain
class AppDelegate: UIResponder, UIApplicationDelegate {

    var window: UIWindow?

    func application(_ application: UIApplication, didFinishLaunchingWithOptions launchOptions: [UIApplicationLaunchOptionsKey: Any]?) -> Bool {
        
        if let url = FileManager.default.containerURL(forSecurityApplicationGroupIdentifier: "group.com.myapp")?.appendingPathComponent("file_name") {
            try? "MyText".write(to: url, atomically: true, encoding: .utf8)
        }
        
        return true
    }
}

FileManager.default.containerURL(forSecurityApplicationGroupIdentifier:)がApp Group用のURLを生成するメソッドです。
このURLに保存されたファイルは、他アプリでも取得する事ができます。

ちなみにこのメソッドに設定してないIDを入れるとnilが返ってきます。

FileManager.default.containerURL(forSecurityApplicationGroupIdentifier: "group.dummy") // → nil

アプリを実行してテキストを保存します。
続けて別アプリでファイルの読み込みができるかも調べてみます。

MyApp2のAppDelegate.swiftを以下のように修正して下さい。

import UIKit

@UIApplicationMain
class AppDelegate: UIResponder, UIApplicationDelegate {
    var window: UIWindow?
    
    func application(_ application: UIApplication, didFinishLaunchingWithOptions launchOptions: [UIApplicationLaunchOptionsKey: Any]?) -> Bool {
        
        if let url = FileManager.default.containerURL(forSecurityApplicationGroupIdentifier: "group.com.myapp")?.appendingPathComponent("file_name") {
            print(try? String(contentsOf: url))
        }
        
        return true
    }
}

実行すると、MyApp1で保存したテキストがMyApp2で取得できている事が分かります。

f:id:llcc:20170912143810p:plain

App Group用URLの中身

FileManager.default.containerURL(forSecurityApplicationGroupIdentifier: "group.com.myapp")ですが、パスは下のようなものになります。

file:///Users/xxxxx(ユーザー名)/Library/Developer/CoreSimulator/Devices/xxxxxx(ランダムな文字列)/data/Containers/Shared/AppGroup/xxxxxx(ランダムな文字列)/

普通にファイルを保存する時のフォルダは下URLです。

let path = NSSearchPathForDirectoriesInDomains(.documentDirectory, .allDomainsMask, true).first
// → /Users/xxxxx(ユーザー名)/Library/Developer/CoreSimulator/Devices/xxxxxx(ランダムな文字列)/data/Containers/Data/Application/xxxxxx(ランダムな文字列)/Documents

見比べてみるとContainers以下が違っている事が分かります。

data/Containers/Shared/AppGroup/xxxxxx(ランダムな文字列)/
data/Containers/Data/Application/xxxxxx(ランダムな文字列)/Documents

画像の共有

最後に画像の共有も試してみようと思います。

MyApp1のAppDelegateを下のように修正します。
テキストを保存した時と同じように、画像をストレージに保存します。

import UIKit

@UIApplicationMain
class AppDelegate: UIResponder, UIApplicationDelegate {

    var window: UIWindow?

    func application(_ application: UIApplication, didFinishLaunchingWithOptions launchOptions: [UIApplicationLaunchOptionsKey: Any]?) -> Bool {
        
        if let url = FileManager.default.containerURL(forSecurityApplicationGroupIdentifier: "group.com.clhs09")?.appendingPathComponent("image") {
            try? UIImageJPEGRepresentation(#imageLiteral(resourceName: "image"), 1.0)?.write(to: url)
        }
        
        return true
    }
}

次にMyApp2で画像の取得をします。

import UIKit

@UIApplicationMain
class AppDelegate: UIResponder, UIApplicationDelegate {
    var window: UIWindow?
    
    func application(_ application: UIApplication, didFinishLaunchingWithOptions launchOptions: [UIApplicationLaunchOptionsKey: Any]?) -> Bool {
        
        if let url = FileManager.default.containerURL(forSecurityApplicationGroupIdentifier: "group.com.clhs09")?.appendingPathComponent("image") {
            print(try? Data(contentsOf: url))
            
        }
        
        return true
    }
}

実行するとデータの取得に成功したことが分かります。

f:id:llcc:20170912145155p:plain

【iOS10.3】SKStoreReviewControllerでレビュー依頼

SKStoreReviewControllerを使ったレビュー依頼を試してみました。

SKStoreReviewControllerとは

SKStoreReviewControllerとはiOS10.3で登場したレビュー依頼のクラスで、ユーザーが簡単にレビューを行う事ができます。
ユーザーがレビューしやすくなる半面、「ユーザー設定でポップアップ表示をOFFにできる」「1つのアプリで年に3回までしか出せない」などの制約があります。

レビュー依頼をしてみる

レビュー依頼のコードは下の通りです。
requestReviewメソッドを呼び出すだけでレビュー依頼ができるようになります。

import UIKit
import StoreKit

class ViewController: UIViewController {
    override func viewDidAppear(_ animated: Bool) {
        super.viewDidAppear(animated)
        
        SKStoreReviewController.requestReview()
    }
}

実際の画面は下の通りです。

f:id:llcc:20170911164913p:plain

星を押すと下のような画面になります。
今回は開発版だったためか、送信ボタンは押せませんでした。

f:id:llcc:20170911165218p:plain

それとSKStoreReviewControllerではrequestReviewメソッドしか用意されていません。
レビューしたかどうかの確認や、ユーザーがレビューポップアップを拒否設定しているかなどは取得できなさそうです。

@available(iOS 10.3, *)
open class SKStoreReviewController : NSObject {
    open class func requestReview()
}

CoreImageのフィルターを試してみる(CICategoryColorAdjustment、その1)

前回に続いて、CoreImageのCICategoryColorAdjustmentフィルターを試してみました。

CoreImageのフィルターを試してみる(CICategoryBlur) - しめ鯖日記

今回も画像はぱくたそ様のものを使わせて頂きました。

f:id:llcc:20170910143041p:plain

画像表示処理は下の通りです。

import UIKit

class ViewController: UIViewController {
    let imageView = UIImageView(image: #imageLiteral(resourceName: "image"))
    
    override func viewDidLoad() {
        super.viewDidLoad()
        
        imageView.frame = CGRect(
            x: (view.frame.width - #imageLiteral(resourceName: "image").size.width) / 2, y: 20,
            width: #imageLiteral(resourceName: "image").size.width, height: #imageLiteral(resourceName: "image").size.height)
        view.addSubview(imageView)
    }
}

フィルターをかける処理は下の通りです。

let filter = CIFilter(name: "CIBoxBlur")
let ciImage = CIImage(image: #imageLiteral(resourceName: "image"))
filter?.setValue(ciImage, forKey: kCIInputImageKey)
if let filteredImage = filter?.outputImage {
    imageView.image = UIImage(ciImage: filteredImage)
}

CIColorClamp

CIColorClampは画像のRGBAの値を調整できるフィルターです。
inputMaxComponentsとinputMinComponentsを使って調整します。

次のようにinputMinComponentsの赤部分を1にすると、画像が赤くなります。

let filter = CIFilter(name: "CIColorClamp")
let ciImage = CIImage(image: #imageLiteral(resourceName: "image"))
filter?.setValue(ciImage, forKey: kCIInputImageKey)
filter?.setValue(CIVector(x: 1, y: 1, z: 1, w: 1), forKey: "inputMaxComponents")
filter?.setValue(CIVector(x: 1, y: 0, z: 0, w: 0), forKey: "inputMinComponents")
if let filteredImage = filter?.outputImage {
    imageView.image = UIImage(ciImage: filteredImage)
}

f:id:llcc:20170910150844p:plain

逆にinputMaxComponentsの赤部分を0にすることで、赤味をなくす事もできます。

let filter = CIFilter(name: "CIColorClamp")
let ciImage = CIImage(image: #imageLiteral(resourceName: "image"))
filter?.setValue(ciImage, forKey: kCIInputImageKey)
filter?.setValue(CIVector(x: 0, y: 1, z: 1, w: 1), forKey: "inputMaxComponents")
filter?.setValue(CIVector(x: 0, y: 0, z: 0, w: 0), forKey: "inputMinComponents")
if let filteredImage = filter?.outputImage {
    imageView.image = UIImage(ciImage: filteredImage)
}

f:id:llcc:20170910151045p:plain

他にもAlpha値を調整して、画像を半透明にすることもできます。

let filter = CIFilter(name: "CIColorClamp")
let ciImage = CIImage(image: #imageLiteral(resourceName: "image"))
filter?.setValue(ciImage, forKey: kCIInputImageKey)
filter?.setValue(CIVector(x: 1, y: 1, z: 1, w: 0.5), forKey: "inputMaxComponents")
filter?.setValue(CIVector(x: 0, y: 0, z: 0, w: 0), forKey: "inputMinComponents")
if let filteredImage = filter?.outputImage {
    imageView.image = UIImage(ciImage: filteredImage)
}

f:id:llcc:20170910151152p:plain

CIColorControls

CIColorControlsは彩度、明るさ、コントラストを調整します。
セットする値は、下のinputSaturationとinputBrightnessとinputContrastの3つです。

let filter = CIFilter(name: "CIColorControls")
let ciImage = CIImage(image: #imageLiteral(resourceName: "image"))
filter?.setValue(ciImage, forKey: kCIInputImageKey)
filter?.setValue(1, forKey: "inputSaturation")
filter?.setValue(0, forKey: "inputBrightness")
filter?.setValue(1, forKey: "inputContrast")
if let filteredImage = filter?.outputImage {
    imageView.image = UIImage(ciImage: filteredImage)
}

inputSaturationを0.5にすると下のように少し暗くなります。

f:id:llcc:20170910152012p:plain

inputBrightnessを0.5にすると、明るさが増します。

f:id:llcc:20170910152101p:plain

inputContrastを0.5にすると少しぼやけたような画像になります。

f:id:llcc:20170910152131p:plain

CIColorMatrix

CIColorMatrixはCIColorClampと同様にRGBAを調整するフィルターです。
下のように各色のベクトルを調整することで画像を調整します。

let filter = CIFilter(name: "CIColorMatrix")
let ciImage = CIImage(image: #imageLiteral(resourceName: "image"))
filter?.setValue(ciImage, forKey: kCIInputImageKey)
filter?.setValue(CIVector(x: 1, y: 0, z: 0, w: 0), forKey: "inputRVector")
filter?.setValue(CIVector(x: 0, y: 1, z: 0, w: 0), forKey: "inputGVector")
filter?.setValue(CIVector(x: 0, y: 0, z: 1, w: 0), forKey: "inputBVector")
filter?.setValue(CIVector(x: 0, y: 0, z: 0, w: 1), forKey: "inputAVector")
filter?.setValue(CIVector(x: 0, y: 0, z: 0, w: 0), forKey: "inputBiasVector")
if let filteredImage = filter?.outputImage {
    imageView.image = UIImage(ciImage: filteredImage)
}

inputGVectorのyを0にすると、緑色のない画像になります。

let filter = CIFilter(name: "CIColorMatrix")
let ciImage = CIImage(image: #imageLiteral(resourceName: "image"))
filter?.setValue(ciImage, forKey: kCIInputImageKey)
filter?.setValue(CIVector(x: 1, y: 0, z: 0, w: 0), forKey: "inputRVector")
filter?.setValue(CIVector(x: 0, y: 0, z: 0, w: 0), forKey: "inputGVector")
filter?.setValue(CIVector(x: 0, y: 0, z: 1, w: 0), forKey: "inputBVector")
filter?.setValue(CIVector(x: 0, y: 0, z: 0, w: 1), forKey: "inputAVector")
filter?.setValue(CIVector(x: 0, y: 0, z: 0, w: 0), forKey: "inputBiasVector")
if let filteredImage = filter?.outputImage {
    imageView.image = UIImage(ciImage: filteredImage)
}

f:id:llcc:20170910152725p:plain

inputBiasVectorのyに1を入れると、緑色の画像になります。

let filter = CIFilter(name: "CIColorMatrix")
let ciImage = CIImage(image: #imageLiteral(resourceName: "image"))
filter?.setValue(ciImage, forKey: kCIInputImageKey)
filter?.setValue(CIVector(x: 1, y: 0, z: 0, w: 0), forKey: "inputRVector")
filter?.setValue(CIVector(x: 0, y: 0, z: 0, w: 0), forKey: "inputGVector")
filter?.setValue(CIVector(x: 0, y: 0, z: 1, w: 0), forKey: "inputBVector")
filter?.setValue(CIVector(x: 0, y: 0, z: 0, w: 1), forKey: "inputAVector")
filter?.setValue(CIVector(x: 0, y: 0, z: 0, w: 0), forKey: "inputBiasVector")
if let filteredImage = filter?.outputImage {
    imageView.image = UIImage(ciImage: filteredImage)
}

f:id:llcc:20170910152811p:plain