しめ鯖日記

swift, iPhoneアプリ開発, ruby on rails等のTipsや入門記事書いてます

【Swif】指紋認証時のUIApplicationDelegateメソッドに関する検証

iOSで指紋認証をした時、AppDelegateのどのメソッドが呼ばれるかを調査しました。
指紋認証の方法は下記事を元にしました。

www.cl9.info

検証

アプリを作ったら、AppDelegateを以下のように修正します。
これで、指紋認証時にどのメソッドが呼ばれるかを検証できます。

import UIKit
import LocalAuthentication

@UIApplicationMain
class AppDelegate: UIResponder, UIApplicationDelegate {
    var window: UIWindow?
    
    func application(_ application: UIApplication, didFinishLaunchingWithOptions launchOptions: [UIApplicationLaunchOptionsKey: Any]?) -> Bool {
        
        print(#function)
        DispatchQueue.main.asyncAfter(wallDeadline: .now() + 5.0, execute: {
            let context = LAContext()
            var error: NSError?
            if context.canEvaluatePolicy(.deviceOwnerAuthenticationWithBiometrics, error: &error) {
                context.evaluatePolicy(.deviceOwnerAuthenticationWithBiometrics, localizedReason: "テスト") { success, error in
                    
                }
            }
        })
        
        return true
    }
    
    func applicationWillResignActive(_ application: UIApplication) {
        print(#function)
    }
    
    func applicationDidEnterBackground(_ application: UIApplication) {
        print(#function)
    }
    
    func applicationWillEnterForeground(_ application: UIApplication) {
        print(#function)
    }
    
    func applicationDidBecomeActive(_ application: UIApplication) {
        print(#function)
    }
}

アプリを立ち上げると以下のログが出力されます。

application(_:didFinishLaunchingWithOptions:)
applicationDidBecomeActive

指紋認証アラートが立ち上がる時は以下のログが出力されました。

applicationWillResignActive

f:id:llcc:20170706231057p:plain

認証 or キャンセルをすると以下のログが出力されます。

applicationDidBecomeActive

ちなみに「アプリをバックグラウンドに移動 → アプリ立ち上げ」の時は下のログが出力されます。

applicationWillResignActive
applicationDidEnterBackground
applicationWillEnterForeground
applicationDidBecomeActive

まとめ

指紋認証の時は、以下のDelegateメソッドが呼ばれる。

applicationWillResignActive
applicationDidBecomeActive

アプリをバックグラウンドに移動&立ち上げすると、以下のDelegateメソッドが呼ばれる。

applicationWillResignActive
applicationDidEnterBackground
applicationWillEnterForeground
applicationDidBecomeActive

【Reporter】iTunesConnectの売上取得をID/Pass方式からAccessToken形式に切替

iTunesConnectの売上情報をAPIで取得する部分の修正をしました。
以前はID/Passwordを使った取得方式だったのですが、Appleから「ID/Password方式は2017年8月から使えなくなるよ」というメールが来たのでAccessTokenで取得する方式に変更しました。

ID/Passwordを使った方法

今までは下のようなコマンドで認証情報を取得していました。

{vendor_id}は、iTunesConnectの「売上とトレンド」の「売上とトレンドのレポート」のアカウント名の隣に表示されています。(2019年02月現在)

java -jar Reporter.jar p=Reporter.properties Sales.getReport [vendor_id], Sales, Summary, Daily, [日付(20170701など)]

認証情報はReporter.propertiesファイルに記載します。
これは上のコマンドを打つパスに配置してください。

userID/passwordはiTunesConnectにログインするID/Passwordです。

userID = [apple_id]
password = [password]

Mode=Robot.xml

SalesUrl=https://reportingitc-reporter.apple.com/reportservice/sales/v1
FinanceUrl=https://reportingitc-reporter.apple.com/reportservice/finance/v1

上コマンドを叩くと、S_D_[vendor_id]_20170630.txt.gzというファイルが作成されます。
解凍すると、以下のようなアプリの日時レポートが取得できます。

Provider Provider Country    SKU Developer   Title   Version Product Type Identifier Units   Developer Proceeds  Begin Date  End Date    Customer Currency   Country Code    Currency of Proceeds    Apple Identifier    Customer Price  Promo Code  Parent Identifier   Subscription    Period  Category    CMB Device  Supported Platforms Proceeds Reason Preserved Pricing   Client
APPLE   US  com.mydomain    DeveloperName   AppName 1   1   0   06/30/2017  06/30/2017  AUD AU  AUD xxxxxxxxxxxx    0                   Business        iPhone  iOS          

AccessTokenを使った方法

次は上のレポートをAccessTokenを使って取得します。
Reporter.propertiesのuserIDとpasswordを消してAccountとAccessTokenを追加します。

Account = [AccountNumber]
AccessToken = [AccessToken]

Mode=Robot.xml

SalesUrl=https://reportingitc-reporter.apple.com/reportservice/sales/v1
FinanceUrl=https://reportingitc-reporter.apple.com/reportservice/finance/v1

AccessTokenはiTunesConnectの「売上とトレンド」の「売上とトレンドのレポート」の右上にある「レポートについて」の右のハテナマークから生成します。
このトークンは半年で期限が切れるため、都度更新する必要がありそうです。

AccountNumberは、AccessTokenを記入後に以下のコマンドを実行することで取得できました。

java -jar Reporter.jar p=Reporter.properties Sales.getAccounts

以上でAccessTokenへの切り替えは完了です。

参考URL

Reporter User Guide 3.0

カイ二乗検定とは何かを調べてみる

統計について調べていたら「カイ二乗検定」という単語が出てきたので調査。

カイ二乗検定とは

カイ二乗検定 - Wikipedia

帰無仮説が正しければ検定統計量が漸近的にカイ二乗分布に従うような統計学的検定法の総称である。次のようなものを含む。

Wikipediaによるとカイ二乗検定とは上のような定義になります。
同じくWikipediaによると、以下のような統計学的検定法の総称のようです。

定義を読むだけでは難しいので、実際の問題を解きながら勉強してみようと思います。

カイ二乗検定の具体例

カイ二乗検定 - 大人になってからの再学習

上のサイトを参考に勉強しました。
こちらのサイトの例2(サイコロを複数回振った結果を元に、サイコロが歪んでいると言えるか求める)の手順を見たところ、カイ二乗検定は下の手順で正しさを検証するようです。

  1. 期待する値(期待度数)、上の例だとサイコロのそれぞれの値が出る確率を算出する
  2. (“実際にある値が出た数” - 期待度数)の2乗 / 期待度数を算出する
  3. それぞれの値について、2で出した値を足し合わせる(この結果をカイ二乗値と呼ぶ)
  4. 今回の問題に関する自由度を求める(今回は項目数6なので6-1で5になる)
  5. 今回の問題に関する有意水準を決める(今回は5%)
  6. 自由度、カイ二乗値、有意水準カイ二乗分布表を使ってサイコロが歪んでいるかどうかの判断をする

上の手順を参考に、実際に自分でも問題を解いてみようと思います。
以下のような問題を定義してみました。

問題

あるグループの血液型分布は下のようなものになった。

血液型 人数
A型 18人
B型 13人
0型 14人
AB型 5人

これは日本全体の血液型分布と異なると言えるか。
日本全体の血液型分布は「A型40%、B型20%、O型30%、AB型10%」と仮定、有意水準は5%とする。

回答

まずは期待度数を算出します。
日本全体の分布は「A型40%、B型20%、O型30%、AB型10%」なので期待度数は以下のようになります。

血液型 人数
A型 20人
B型 10人
0型 15人
AB型 5人

それぞれの血液型の (観測結果 - 期待度数)の2乗 / 期待度数 は以下のようになります。

血液型 人数
A型 0.2
B型 0.9
0型 0.67
AB型 0

カイ二乗値はそれらを足した数なので、1.77になります。
そして自由度は4-1で3となります。

カイ二乗分布表によると、自由度3で5%の確率の値は7.81になります。
今回算出したカイ二乗値はそれより低いので、このグループの血液型分布は日本全体の血液型分布と同じだと言えそうです。

ChameleonでUIColorを便利に使う

Chameleonというライブラリを試してみました。

github.com

インストー

CocoaPodsでインストールします。

pod "ChameleonFramework"

使い方

UIColorに多くのフラットカラーが追加されます。

import UIKit
import ChameleonFramework

class ViewController: UIViewController {
    override func viewDidLoad() {
        super.viewDidLoad()
        
        [
            UIColor.flatRed()!,
            UIColor.flatLime()!,
            UIColor.flatPlum()!
            ].enumerated().forEach {
                
                let colorView = UIView(frame: CGRect(x: 100, y: 100 + 30 * $0.offset, width: 100, height: 30))
                colorView.backgroundColor = $0.element
                view.addSubview(colorView)
        }
    }
}

色は以下のようなものです。

f:id:llcc:20170626233309p:plain

色の明度変更をする事もできます。

import UIKit
import ChameleonFramework

class ViewController: UIViewController {
    override func viewDidLoad() {
        super.viewDidLoad()
        
        let darkView = UIView(frame: CGRect(x: 100, y: 100, width: 100, height: 30))
        darkView.backgroundColor = UIColor.red.darken(byPercentage: 0.5)
        view.addSubview(darkView)
        
        let lightView = UIView(frame: CGRect(x: 100, y: 130, width: 100, height: 30))
        lightView.backgroundColor = UIColor.red.lighten(byPercentage: 0.5)
        view.addSubview(lightView)
    }
}

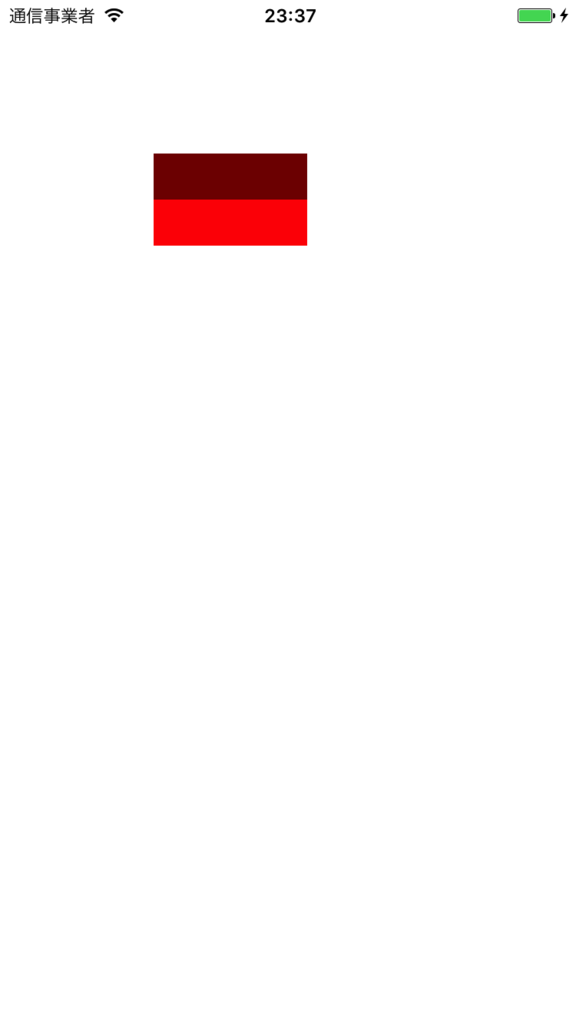
下のように明るい赤と暗い赤を取得できます。

f:id:llcc:20170626233718p:plain

グラデーションも簡単に実装できます。

import UIKit
import ChameleonFramework

class ViewController: UIViewController {
    override func viewDidLoad() {
        super.viewDidLoad()
        
        let colorView = UIView(frame: CGRect(x: 100, y: 130, width: 100, height: 30))
        colorView.backgroundColor = UIColor(gradientStyle: .leftToRight, withFrame: CGRect(x: 100, y: 100, width: 100, height: 30), andColors: [UIColor.red, UIColor.blue, UIColor.purple])
        view.addSubview(colorView)
    }
}

以下のように赤、青、紫のグラデーションを表現できました。

f:id:llcc:20170626233958p:plain

complementaryFlatColorOfを使うとフラットな補色を取得する事ができます。

import UIKit
import ChameleonFramework

class ViewController: UIViewController {
    override func viewDidLoad() {
        super.viewDidLoad()
        
        let colorView = UIView(frame: CGRect(x: 100, y: 130, width: 100, height: 30))
        colorView.backgroundColor = UIColor(complementaryFlatColorOf: UIColor.red)
        view.addSubview(colorView)
    }
}

引数に赤を渡したら、下のようにフラットな緑色が返ってきました。

f:id:llcc:20170626234546p:plain

色に合わせて白 or 黒を返してくれるメソッドもあります。
黄色だったら黒・赤だったら白など、その色と対照的な色を返してくれます。
色の上に乗せる文字色を決めるのに便利そうです。

import UIKit
import ChameleonFramework

class ViewController: UIViewController {
    override func viewDidLoad() {
        super.viewDidLoad()
        
        let colorView = UIView(frame: CGRect(x: 100, y: 130, width: 100, height: 30))
        colorView.backgroundColor = UIColor(contrastingBlackOrWhiteColorOn: UIColor.yellow, isFlat: true)
        view.addSubview(colorView)
    }
}

他にも画像の特定座標の色取得など、便利な機能が揃っているようです。

ダイクストラ法で最短経路を求めてみる

ダイクストラ法という最短経路を求めるアルゴリズムをSwiftで試してみました。
参考にさせて頂いたのはこちらの記事です。

ダイクストラ法(最短経路問題)

ダイクストラ法とは

ダイクストラ法(だいくすとらほう、英: Dijkstra’s algorithm)はグラフ理論における辺の重みが非負数の場合の単一始点最短経路問題を解くための最良優先探索によるアルゴリズムである。

Wikipediaによると上記のようなものになります。

ダイクストラ法 - Wikipedia

今回はこれをSwiftで実装してみます。

実装

まずは画面上に点を設置します。

import UIKit

class ViewController: UIViewController {
    override func viewDidLoad() {
        super.viewDidLoad()
        
        (0...5).forEach { _ in
            let dot = UIView(frame: CGRect(
                x: CGFloat(arc4random_uniform(UInt32(Int32(view.frame.width)))),
                y: CGFloat(arc4random_uniform(UInt32(Int32(view.frame.height)))),
                width: 20, height: 20))
            dot.backgroundColor = UIColor.darkGray
            dot.layer.cornerRadius = dot.frame.width / 2
            view.addSubview(dot)
        }
    }
}
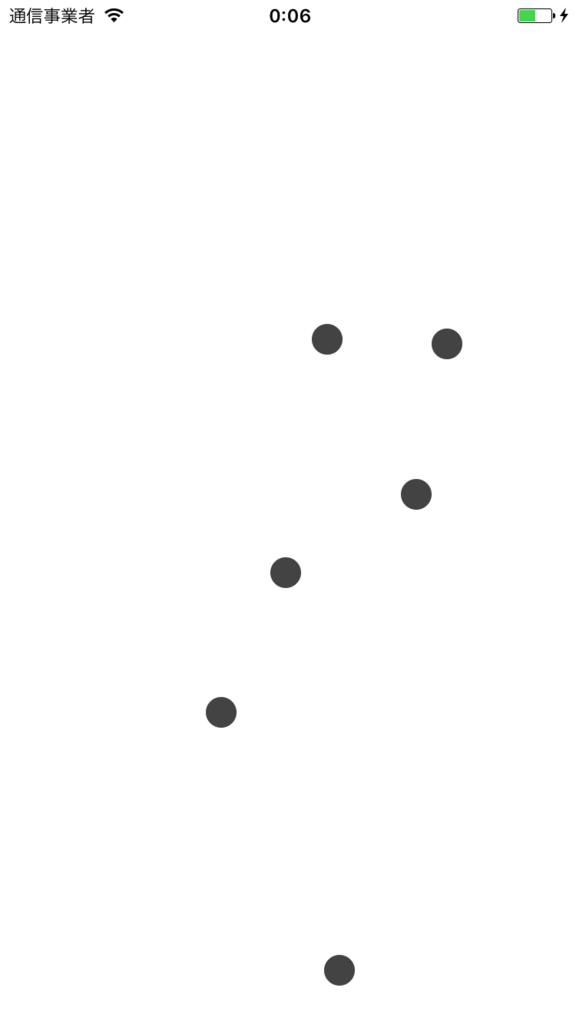
f:id:llcc:20170519000635p:plain

次にStartとGoalを決めます。

class ViewController: UIViewController {
    override func viewDidLoad() {
        super.viewDidLoad()
        
        var dots: [UIView] = []
        (0...5).forEach { _ in
            let dot = UIView(frame: CGRect(
                x: CGFloat(arc4random_uniform(UInt32(Int32(view.frame.width)))),
                y: CGFloat(arc4random_uniform(UInt32(Int32(view.frame.height)))),
                width: 20, height: 20))
            dot.backgroundColor = UIColor.darkGray
            dot.layer.cornerRadius = dot.frame.width / 2
            dots.append(dot)
            view.addSubview(dot)
        }
        
        let startLabel = UILabel(frame: CGRect(x: 0, y: 0, width: 20, height: 20))
        startLabel.text = "S"
        startLabel.textColor = UIColor.white
        startLabel.textAlignment = .center
        dots.first?.addSubview(startLabel)
        let goalLabel = UILabel(frame: CGRect(x: 0, y: 0, width: 20, height: 20))
        goalLabel.text = "G"
        goalLabel.textColor = UIColor.white
        goalLabel.textAlignment = .center
        dots.last?.addSubview(goalLabel)
    }
}
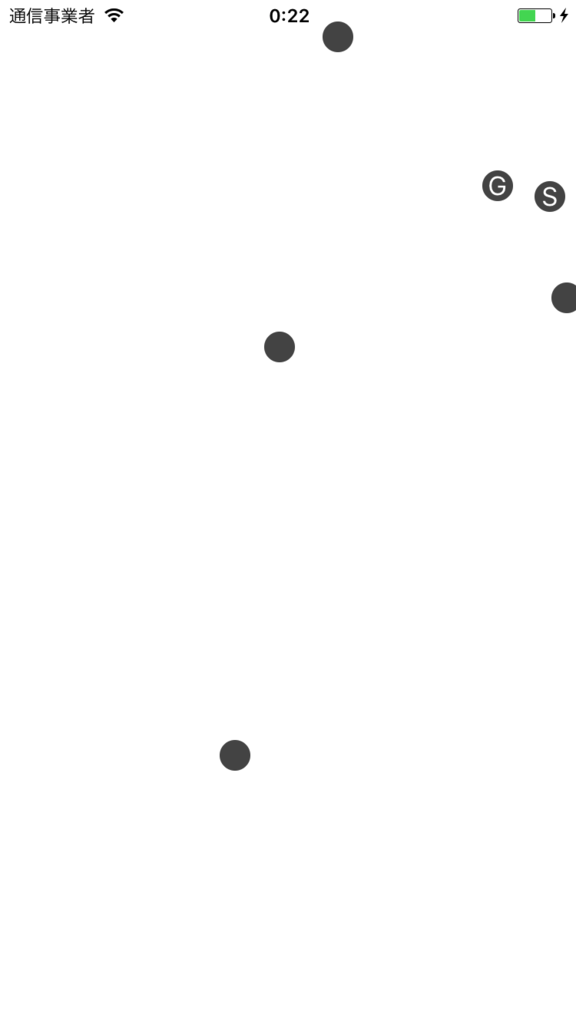
f:id:llcc:20170519002227p:plain

続けて線同士を繋げて経路を作ろうと思います。

各点に他経路への参照を持たせるためにDotViewというクラスを作って各点をUIViewからDotViewにします。
下だと場合によっては循環参照が起こったり場合によってゴールまで着けない事もあるのですが、今回は「ダイクストラ法」の勉強という事で無視します。

import UIKit

class ViewController: UIViewController {
    override func viewDidLoad() {
        super.viewDidLoad()
        
        var dots: [DotView] = [] // UIViewをDotViewに変更
        (0...5).forEach { _ in
            let dot = DotView(frame: CGRect( // UIViewをDotViewに変更
                x: CGFloat(arc4random_uniform(UInt32(Int32(view.frame.width)))),
                y: CGFloat(arc4random_uniform(UInt32(Int32(view.frame.height)))),
                width: 20, height: 20))
            dot.backgroundColor = UIColor.darkGray
            dot.layer.cornerRadius = dot.frame.width / 2
            dots.append(dot)
            view.addSubview(dot)
        }
        
        let startLabel = UILabel(frame: CGRect(x: 0, y: 0, width: 20, height: 20))
        startLabel.text = "S"
        startLabel.textColor = UIColor.white
        startLabel.textAlignment = .center
        dots.first?.addSubview(startLabel)
        let goalLabel = UILabel(frame: CGRect(x: 0, y: 0, width: 20, height: 20))
        goalLabel.text = "G"
        goalLabel.textColor = UIColor.white
        goalLabel.textAlignment = .center
        dots.last?.addSubview(goalLabel)
        
        // 以下今回追加
        dots.forEach { dot in
            var otherDots = dots.filter { $0 != dot }
            dot.otherDots.append(otherDots.remove(at: Int(arc4random_uniform(UInt32(otherDots.count)))))
            dot.otherDots.append(otherDots.remove(at: Int(arc4random_uniform(UInt32(otherDots.count)))))
        }
    }
}

// 以下が今回追加分
class DotView: UIView {
    var otherDots: [UIView] = []
}

上で参照を持たせたので、次は線を引きます。

import UIKit

class ViewController: UIViewController {
    override func viewDidLoad() {
        super.viewDidLoad()
        
        var dots: [DotView] = []
        (0...5).forEach { _ in
            let dot = DotView(frame: CGRect(
                x: CGFloat(arc4random_uniform(UInt32(Int32(view.frame.width)))),
                y: CGFloat(arc4random_uniform(UInt32(Int32(view.frame.height)))),
                width: 20, height: 20))
            dot.backgroundColor = UIColor.darkGray
            dot.layer.cornerRadius = dot.frame.width / 2
            dots.append(dot)
            view.addSubview(dot)
        }
        
        let startLabel = UILabel(frame: CGRect(x: 0, y: 0, width: 20, height: 20))
        startLabel.text = "S"
        startLabel.textColor = UIColor.white
        startLabel.textAlignment = .center
        dots.first?.addSubview(startLabel)
        let goalLabel = UILabel(frame: CGRect(x: 0, y: 0, width: 20, height: 20))
        goalLabel.text = "G"
        goalLabel.textColor = UIColor.white
        goalLabel.textAlignment = .center
        dots.last?.addSubview(goalLabel)
        
        dots.forEach { dot in
            var otherDots = dots.filter { $0 != dot }
            dot.otherDots.append(otherDots.remove(at: Int(arc4random_uniform(UInt32(otherDots.count)))))
            dot.otherDots.append(otherDots.remove(at: Int(arc4random_uniform(UInt32(otherDots.count)))))
        }
        // 以下は今回追加
        dots.forEach { dot in
            dot.otherDots.forEach { otherDot in
                let lineView = LineView(start: dot.frame.origin, end: otherDot.frame.origin)
                view.addSubview(lineView)
                view.sendSubview(toBack: lineView)
            }
        }
    }
}

class DotView: UIView {
    var otherDots: [DotView] = []
}

// 以下は今回追加
class LineView: UIView {
    let start: CGPoint
    let end: CGPoint
    
    init(start: CGPoint, end: CGPoint) {
        self.start = start
        self.end   = end
        
        super.init(frame: CGRect(
            x: ([start.x, end.x].min() ?? 0) + 10,
            y: ([start.y, end.y].min() ?? 0) + 10,
            width: abs(start.x - end.x),
            height: abs(start.y - end.y)))
        
        backgroundColor = UIColor.clear
    }
    
    required init?(coder aDecoder: NSCoder) {
        fatalError("init(coder:) has not been implemented")
    }
    
    override func draw(_ rect: CGRect) {
        let path = UIBezierPath()
        path.move(to: CGPoint(x: start.x - frame.origin.x + 10, y: start.y - frame.origin.y + 10))
        path.addLine(to: CGPoint(x: end.x - frame.origin.x + 10, y: end.y - frame.origin.y + 10))
        path.lineWidth = 4.0
        UIColor.darkGray.setStroke()
        path.stroke()
    }
}

これで経路を作る事ができました。
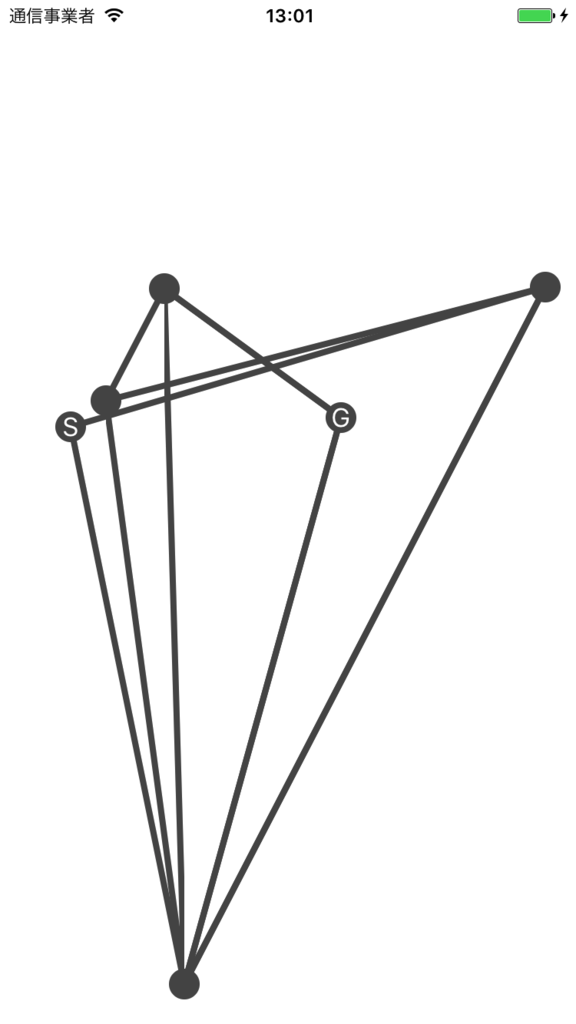
f:id:llcc:20170520130216p:plain

ここからダイクストラ法を実装していきます。
まずはDotViewにtypeとscore(スタートからの距離)を追加して、viewDidLoadの中でtypeを設定します。

import UIKit

class ViewController: UIViewController {
    override func viewDidLoad() {
        super.viewDidLoad()
        
        var dots: [DotView] = []
        (0...5).forEach { _ in
            let dot = DotView(frame: CGRect(
                x: CGFloat(arc4random_uniform(UInt32(Int32(view.frame.width)))),
                y: CGFloat(arc4random_uniform(UInt32(Int32(view.frame.height)))),
                width: 20, height: 20))
            dot.backgroundColor = UIColor.darkGray
            dot.layer.cornerRadius = dot.frame.width / 2
            dots.append(dot)
            view.addSubview(dot)
        }
        
        let startLabel = UILabel(frame: CGRect(x: 0, y: 0, width: 20, height: 20))
        startLabel.text = "S"
        startLabel.textColor = UIColor.white
        startLabel.textAlignment = .center
        dots.first?.addSubview(startLabel)
        dots.first?.type = .start // 追加
        let goalLabel = UILabel(frame: CGRect(x: 0, y: 0, width: 20, height: 20))
        goalLabel.text = "G"
        goalLabel.textColor = UIColor.white
        goalLabel.textAlignment = .center
        dots.last?.addSubview(goalLabel)
        dots.last?.type = .goal // 追加
        
        dots.forEach { dot in
            var otherDots = dots.filter { $0 != dot }
            dot.otherDots.append(otherDots.remove(at: Int(arc4random_uniform(UInt32(otherDots.count)))))
            dot.otherDots.append(otherDots.remove(at: Int(arc4random_uniform(UInt32(otherDots.count)))))
        }
        dots.forEach { dot in
            dot.otherDots.forEach { otherDot in
                let lineView = LineView(start: dot.frame.origin, end: otherDot.frame.origin)
                view.addSubview(lineView)
                view.sendSubview(toBack: lineView)
            }
        }
    }
}

// 今回修正
class DotView: UIView {
    enum DotType {
        case start
        case goal
        case normal
    }
    
    var otherDots: [DotView] = []
    var score: CGFloat = 0
    var type: DotType = .normal
    var routeDots: [DotView] = []
}

// 省略

経路を作ったので、どれが最短経路かを計算します。
ViewControllerを以下のように修正します。

import UIKit

class ViewController: UIViewController {
    override func viewDidLoad() {
        super.viewDidLoad()
        
        var dots: [DotView] = []
        (0...5).forEach { _ in
            let dot = DotView(frame: CGRect(
                x: CGFloat(arc4random_uniform(UInt32(Int32(view.frame.width)))),
                y: CGFloat(arc4random_uniform(UInt32(Int32(view.frame.height)))),
                width: 20, height: 20))
            dot.backgroundColor = UIColor.darkGray
            dot.layer.cornerRadius = dot.frame.width / 2
            dots.append(dot)
            view.addSubview(dot)
        }
        
        let startLabel = UILabel(frame: CGRect(x: 0, y: 0, width: 20, height: 20))
        startLabel.text = "S"
        startLabel.textColor = UIColor.white
        startLabel.textAlignment = .center
        dots.first?.addSubview(startLabel)
        dots.first?.type = .start
        let goalLabel = UILabel(frame: CGRect(x: 0, y: 0, width: 20, height: 20))
        goalLabel.text = "G"
        goalLabel.textColor = UIColor.white
        goalLabel.textAlignment = .center
        dots.last?.addSubview(goalLabel)
        dots.last?.type = .goal
        
        dots.forEach { dot in
            var otherDots = dots.filter { $0 != dot }
            dot.otherDots.append(otherDots.remove(at: Int(arc4random_uniform(UInt32(otherDots.count)))))
            dot.otherDots.append(otherDots.remove(at: Int(arc4random_uniform(UInt32(otherDots.count)))))
        }
        dots.forEach { dot in
            dot.otherDots.forEach { otherDot in
                let lineView = LineView(start: dot.frame.origin, end: otherDot.frame.origin)
                view.addSubview(lineView)
                view.sendSubview(toBack: lineView)
            }
        }
        
        if let start = dots.first {
            var targetDots = [start]
            while targetDots.count != 0 {
                let targetDot = targetDots.remove(at: 0)
                targetDot.otherDots.forEach {
                    let dx = targetDot.frame.origin.x - $0.frame.origin.x
                    let dy = targetDot.frame.origin.y - $0.frame.origin.y
                    if $0.score == 0 || targetDot.score + sqrt(dx*dx + dy*dy) < $0.score {
                        $0.score = targetDot.score + sqrt(dx*dx + dy*dy)
                        targetDots.append($0)
                        $0.routeDots = targetDot.routeDots + [targetDot]
                    }
                }
            }
        }
        if let last = dots.last, last.routeDots.count != 0 {
            last.routeDots.append(last)
            (0...(last.routeDots.count - 2)).forEach {
                let lineView = LineView(
                    start: last.routeDots[$0].frame.origin,
                    end: last.routeDots[$0 + 1].frame.origin,
                    color: UIColor.red,
                    lineWidth: 2)
                view.addSubview(lineView)
            }
        }
    }
}

class DotView: UIView {
    enum DotType {
        case start
        case goal
        case normal
    }
    
    var otherDots: [DotView] = []
    var score: CGFloat = 0
    var type: DotType = .normal
    var routeDots: [DotView] = []
}

class LineView: UIView {
    let start: CGPoint
    let end: CGPoint
    let color: UIColor
    let lineWidth: CGFloat
    
    init(start: CGPoint, end: CGPoint, color: UIColor = UIColor.darkGray, lineWidth: CGFloat = 4) {
        self.start = start
        self.end   = end
        self.color = color
        self.lineWidth = lineWidth
        
        super.init(frame: CGRect(
            x: ([start.x, end.x].min() ?? 0) + 10,
            y: ([start.y, end.y].min() ?? 0) + 10,
            width: abs(start.x - end.x),
            height: abs(start.y - end.y)))
        
        backgroundColor = UIColor.clear
    }
    
    required init?(coder aDecoder: NSCoder) {
        fatalError("init(coder:) has not been implemented")
    }
    
    override func draw(_ rect: CGRect) {
        let path = UIBezierPath()
        path.lineWidth = lineWidth
        color.set()
        path.move(to: CGPoint(x: start.x - frame.origin.x + 10, y: start.y - frame.origin.y + 10))
        path.addLine(to: CGPoint(x: end.x - frame.origin.x + 10, y: end.y - frame.origin.y + 10))
        path.stroke()
    }
}

実際の計算は下の部分です。
スタートから順番に点を辿り、その順路が最短なら更に探索、最短でなければそのルートは探索終了しています。

if let start = dots.first {
    var targetDots = [start]
    while targetDots.count != 0 {
        let targetDot = targetDots.remove(at: 0)
        targetDot.otherDots.forEach {
            let dx = targetDot.frame.origin.x - $0.frame.origin.x
            let dy = targetDot.frame.origin.y - $0.frame.origin.y
            if $0.score == 0 || targetDot.score + sqrt(dx*dx + dy*dy) < $0.score {
                $0.score = targetDot.score + sqrt(dx*dx + dy*dy)
                targetDots.append($0)
                $0.routeDots = targetDot.routeDots + [targetDot]
            }
        }
    }
}

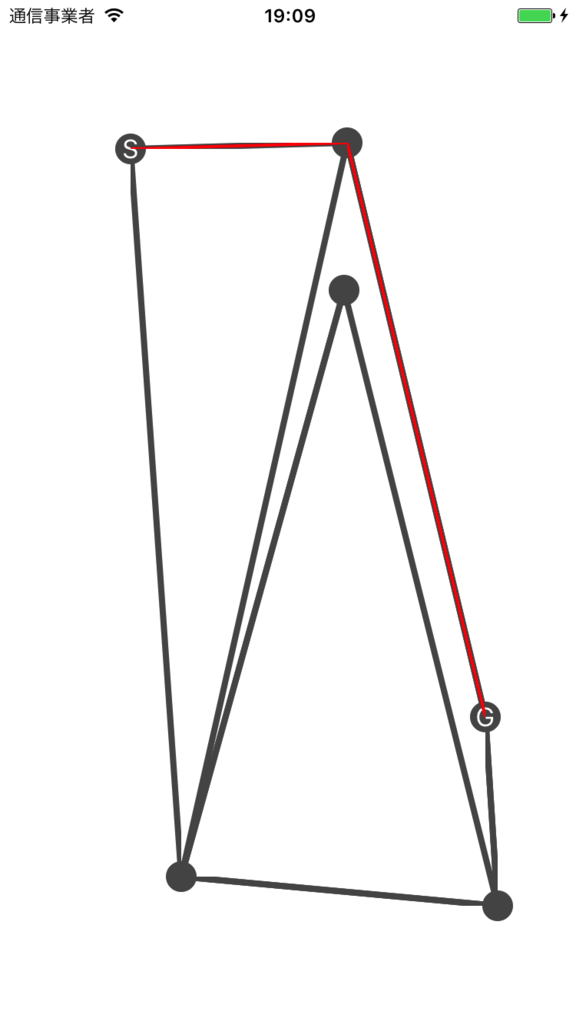
これを実行すると、以下のように最短経路を表示できた事が分かります。
f:id:llcc:20170520191211p:plain

rspec-retryでfeature specを安定させる

rspec-retryという、失敗したテストを再実行するGemを使ってみました。

GitHub - NoRedInk/rspec-retry: retry randomly failing rspec example

まずはRailsのプロジェクトを作ってfeature specを書きます。

require 'rails_helper'

feature 'test' do
  scenario 'ページが表示される' do
    visit users_path

    expect(current_path).to eq users_path
  end
end

ここに一回目だけ失敗する処理を追加します。

require 'rails_helper'

i = 0
feature 'test' do
  scenario 'ページが表示される' do
    i += 1
    raise if i == 1
    visit users_path

    expect(current_path).to eq users_path
  end
end

これを実行するとエラーになります。

f:id:llcc:20170510000358p:plain

次はrspec-retryでエラーが出たら何回かリトライするようにします。
まずはGemfileにrspec-retryを追加します。

group :development, :test do
  gem 'rspec-retry'
end

次はspec_helper.rbにrspec-retry関連の設定を追加します。

require 'rspec/retry'

RSpec.configure do |config|
  config.verbose_retry = true
  config.display_try_failure_messages = true
end

最後にscenarioにretry回数を追加します。

require 'rails_helper'

i = 0
feature 'test' do
  scenario 'ページが表示される', retry: 3 do
    i += 1
    raise if i == 1
    visit users_path

    expect(current_path).to eq users_path
  end
end

実行すると、1回目で失敗したけど2回目で成功したことが分かります。

f:id:llcc:20170510000835p:plain

retryはscenarioではなくfeatureに付ける事もできます。

require 'rails_helper'

i = 0
feature 'test', retry: 3 do
  scenario 'ページが表示される' do
    i += 1
    raise if i == 1
    visit users_path

    expect(current_path).to eq users_path
  end
end

feature spec以外で使う事もできます。

require 'rails_helper'

i = 0
RSpec.describe User, type: :model, retry: 3 do
  it do
    i += 1
    raise if i == 1
    expect(1).to eq 1
  end
end

f:id:llcc:20170510001152p:plain

全feature specを対象にしたい場合は、spec_helper.rbに以下に設定を追加します。

require 'rspec/retry'

RSpec.configure do |config|
  config.verbose_retry = true
  config.display_try_failure_messages = true
  config.around :each, type: :feature do |ex|
    ex.run_with_retry retry: 3
  end
end

モンテカルロ法で円周率を求める

囲碁AIで有名なモンテカルロ法で円周率を計算できるようなので試してみました。

モンテカルロ法とは、Wikipediaによるとシミュレーションや数値計算を乱数を用いて行う手法の総称とのことです。

モンテカルロ法 - Wikipedia

実装方法

計算の手順は下の通りです。

  1. 四角形とそれに内接する円を作成する
  2. 四角形の中に多数の点を配置する
  3. 円の内部にある点の数を円の面積だと仮定して円周率を計算する

まずは四角形と内接する円を作成します。

import UIKit

class ViewController: UIViewController {
    override func viewDidLoad() {
        super.viewDidLoad()
        
        let v = UIView(frame: CGRect(x: 100, y: 100, width: 200, height: 200))
        v.backgroundColor = UIColor.darkGray
        view.addSubview(v)
        let circle = UIView(frame: v.bounds)
        circle.backgroundColor = UIColor.lightGray
        circle.layer.cornerRadius = circle.frame.width / 2
        v.addSubview(circle)
    }
}

これを実行すると、四角形と円が描画されます。

f:id:llcc:20170508235355p:plain

次は四角形の上に点を配置していきます。

class ViewController: UIViewController {
    override func viewDidLoad() {
        super.viewDidLoad()
        
        let v = UIView(frame: CGRect(x: 100, y: 100, width: 200, height: 200))
        v.backgroundColor = UIColor.darkGray
        view.addSubview(v)
        let circle = UIView(frame: v.bounds)
        circle.backgroundColor = UIColor.lightGray
        circle.layer.cornerRadius = circle.frame.width / 2
        v.addSubview(circle)
        
        // ここから今回追加
        var dots: [UIView] = []
        (0...40000).forEach { _ in
            let x = CGFloat(arc4random_uniform(201))
            let y = CGFloat(arc4random_uniform(201))
            let dot = UIView(frame: CGRect(x: x, y: y, width: 1, height: 1))
            dot.backgroundColor = UIColor.white
            v.addSubview(dot)
            dots.append(dot)
        }
    }
}

実行すると、点が配置されているのが分かります。

f:id:llcc:20170509000427p:plain

次に円の中の点の数を計算します。

class ViewController: UIViewController {
    override func viewDidLoad() {
        super.viewDidLoad()
        
        let v = UIView(frame: CGRect(x: 100, y: 100, width: 200, height: 200))
        v.backgroundColor = UIColor.darkGray
        view.addSubview(v)
        let circle = UIView(frame: v.bounds)
        circle.backgroundColor = UIColor.lightGray
        circle.layer.cornerRadius = circle.frame.width / 2
        v.addSubview(circle)
        
        var dots: [UIView] = []
        (0...40000).forEach { _ in
            let x = CGFloat(arc4random_uniform(201))
            let y = CGFloat(arc4random_uniform(201))
            let dot = UIView(frame: CGRect(x: x, y: y, width: 1, height: 1))
            dot.backgroundColor = UIColor.white
            v.addSubview(dot)
            dots.append(dot)
        }
        
        // ここから今回追加
        let count = dots.filter {
            let dx = $0.frame.origin.x - circle.center.x
            let dy = $0.frame.origin.y - circle.center.y
            let radius = circle.frame.size.width / 2
            return dx*dx + dy*dy < radius*radius
        }.count
        print(count) // → 74
    }
}

最後に円の中の点(円の面積)を元に円周率を求めます。
結果は、3.1111と3.14に近い数字となりました。

class ViewController: UIViewController {
    override func viewDidLoad() {
        super.viewDidLoad()
        
        let v = UIView(frame: CGRect(x: 100, y: 100, width: 200, height: 200))
        v.backgroundColor = UIColor.darkGray
        view.addSubview(v)
        let circle = UIView(frame: v.bounds)
        circle.backgroundColor = UIColor.lightGray
        circle.layer.cornerRadius = circle.frame.width / 2
        v.addSubview(circle)
        
        var dots: [UIView] = []
        (0...40000).forEach { _ in
            let x = CGFloat(arc4random_uniform(201))
            let y = CGFloat(arc4random_uniform(201))
            let dot = UIView(frame: CGRect(x: x, y: y, width: 1, height: 1))
            dot.backgroundColor = UIColor.white
            v.addSubview(dot)
            dots.append(dot)
        }
        
        let count = dots.filter {
            let dx = $0.frame.origin.x - circle.center.x
            let dy = $0.frame.origin.y - circle.center.y
            let radius = circle.frame.size.width / 2
            return dx*dx + dy*dy < radius*radius
        }.count
        
        let radius = circle.frame.size.width / 2
        print(CGFloat(count) / radius / radius) // 3.1111
    }
}