しめ鯖日記

swift, iPhoneアプリ開発, ruby on rails等のTipsや入門記事書いてます

User Notifications frameworkでローカル通知を送ってみる

iOS10から使えるようになったUser Notifications frameworkを試してみました。

通知の許可を得る

まずはXcodeにUser Notifications frameworkを追加します。

f:id:llcc:20170327230711p:plain

許可を得る処理は以下の通りです。
引数で使いたいオプションを指定します。

UNUserNotificationCenter.current().requestAuthorization(options: [.badge, .alert, .sound], completionHandler: { result, error in
})

f:id:llcc:20170327231050p:plain

これはiOS9以前での以下の書き方に相当します。

let settings = UIUserNotificationSettings(types: [.badge, .alert, .sound], categories: nil)
UIApplication.shared.registerUserNotificationSettings(settings)

通知を作成する

通知の作成は以下の通りです。
今回は10秒後に起動する通知を作成しました。

let content = UNMutableNotificationContent()
content.title = "たいとる"
content.subtitle = "さぶたいとる"
content.body = "ほんぶん"
content.badge = NSNumber(value: 1)
content.sound = UNNotificationSound.default()
let trigger = UNTimeIntervalNotificationTrigger(timeInterval: 10, repeats: false)
let request = UNNotificationRequest(identifier: "Identifier", content: content, trigger: trigger)
let center = UNUserNotificationCenter.current()
center.add(request)

f:id:llcc:20170327232051p:plain

上ではTimeIntervalを使ってTriggerを作りましたが、DateComponentを使ってTriggerを作る事もできます。

let component = DateComponents(calendar: Calendar.current, year: 2017, month: 3, day: 27, hour: 23, minute: 30)
let trigger = UNCalendarNotificationTrigger(dateMatching: component, repeats: false)

UNUserNotificationCenterにはdelegate

import UserNotifications

@UIApplicationMain
class AppDelegate: UIResponder, UIApplicationDelegate {
    var window: UIWindow?

    func application(_ application: UIApplication, didFinishLaunchingWithOptions launchOptions: [UIApplicationLaunchOptionsKey: Any]?) -> Bool {
        
        let content = UNMutableNotificationContent()
        content.title = "たいとる"
        let component = DateComponents(calendar: Calendar.current, year: 2017, month: 3, day: 27, hour: 23, minute: 30)
        let trigger = UNCalendarNotificationTrigger(dateMatching: component, repeats: false)
        let request = UNNotificationRequest(identifier: "Identifier", content: content, trigger: trigger)
        let center = UNUserNotificationCenter.current()
        center.delegate = self
        center.add(request)
        
        return true
    }
}

extension AppDelegate: UNUserNotificationCenterDelegate {
    func userNotificationCenter(_ center: UNUserNotificationCenter, didReceive response: UNNotificationResponse, withCompletionHandler completionHandler: @escaping () -> Void) {
        
        // バックグラウンドで来た通知をタップしてアプリ起動したら呼ばれる
    }
    
    func userNotificationCenter(_ center: UNUserNotificationCenter, willPresent notification: UNNotification, withCompletionHandler completionHandler: @escaping (UNNotificationPresentationOptions) -> Void) {
        
        // アプリがフォアグラウンドの時に通知が来たら呼ばれる
    }
}

フォアグラウンドで通知が来た時、下のようにcompletionHandlerを実行すれば通知を表示する事ができます。

func userNotificationCenter(_ center: UNUserNotificationCenter, willPresent notification: UNNotification, withCompletionHandler completionHandler: @escaping (UNNotificationPresentationOptions) -> Void) {
        
    completionHandler([.alert, .badge, .sound])
}

f:id:llcc:20170327233403p:plain

通知のキャンセルはremoveAllPendingNotificationRequestsメソッドを使います。
removePendingNotificationRequestsメソッドでIDを指定したキャンセルも可能です。

let center = UNUserNotificationCenter.current()
center.removeAllPendingNotificationRequests()
center.removePendingNotificationRequests(withIdentifiers: ["Identifier"])

GameplayKitの「Entities and Components」を試してみる

GameplayKitの「Entities and Components」を試してみました。

Entities and Componentsとは

Entities and Componentsとは、コンポーネント指向プログラミングをサポートするものです。
コンポーネント指向プログラミングとは、そのオブジェクトの性質を継承などではcomponentの追加を使って表すものです。

例えばタップ時にジャンプするオブジェクトにはジャンプコンポーネントを追加を、ランダムに移動するオブジェクトにはランダム移動コンポーネントの追加をすると言った具合です。
そうすることで、簡単に1つのオブジェクトが複数の性質を持たせる事ができます。

Entities and Componentsの実装

早速実装してみます。
今回はNodeを2つ作って、片方は横移動+タップで回転、もう片方は縦移動+タップで回転するようにします。

まずは画面にNodeを2つ表示します。

import SpriteKit
import GameplayKit

class GameScene: SKScene {
    let node1 = SKSpriteNode(color: UIColor(red: 0.1, green: 0.8, blue: 0.8, alpha: 1), size: CGSize(width: 100, height: 100))
    let node2 = SKSpriteNode(color: UIColor(red: 0.8, green: 0.8, blue: 0.1, alpha: 1), size: CGSize(width: 100, height: 100))
    
    override func didMove(to view: SKView) {
        node1.position.x = -100
        node2.position.x =  100
        
        addChild(node1)
        addChild(node2)
    }
}

f:id:llcc:20170322232927p:plain

次にnode1は右方向、node2は上方向に動くようにします。
まずは上方向に移動する性質を表すHorizontalComponentクラスと横方向に移動する性質を表すVerticalComponentクラスを作ります。

class HorizontalComponent: GKComponent {
    let node: SKNode
    
    init(node: SKNode) {
        self.node = node
        
        super.init()
    }
    
    required init?(coder aDecoder: NSCoder) {
        fatalError("init(coder:) has not been implemented")
    }
    
    override func update(deltaTime seconds: TimeInterval) {
        node.position.x += 1
    }
}

class VerticalComponent: GKComponent {
    let node: SKNode
    
    init(node: SKNode) {
        self.node = node
        
        super.init()
    }
    
    required init?(coder aDecoder: NSCoder) {
        fatalError("init(coder:) has not been implemented")
    }
    
    override func update(deltaTime seconds: TimeInterval) {
        node.position.y += 1
    }
}

続けて今作ったクラスをnode1、node2に適用します。

import SpriteKit
import GameplayKit

class GameScene: SKScene {
    let horizontalComponentSystem = GKComponentSystem(componentClass: HorizontalComponent.self)
    let verticalComponentSystem = GKComponentSystem(componentClass: VerticalComponent.self)
    var lastTime: TimeInterval = 0
    
    let node1 = SKSpriteNode(color: UIColor(red: 0.1, green: 0.8, blue: 0.8, alpha: 1), size: CGSize(width: 100, height: 100))
    let node2 = SKSpriteNode(color: UIColor(red: 0.8, green: 0.8, blue: 0.1, alpha: 1), size: CGSize(width: 100, height: 100))
    let entity1 = GKEntity()
    let entity2 = GKEntity()
    
    override func didMove(to view: SKView) {
        node1.position.x = -100
        node2.position.x =  100
        
        addChild(node1)
        addChild(node2)
        
        let horizontalComponent = HorizontalComponent(node: node1)
        entity1.addComponent(horizontalComponent)
        horizontalComponentSystem.addComponent(horizontalComponent)
        
        let verticalComponent = VerticalComponent(node: node2)
        entity2.addComponent(verticalComponent)
        verticalComponentSystem.addComponent(verticalComponent)
    }
    
    override func update(_ currentTime: TimeInterval) {
        if lastTime == 0 {
            lastTime = currentTime
        }
        let deltaTime = currentTime - lastTime
        horizontalComponentSystem.update(deltaTime: deltaTime)
        verticalComponentSystem.update(deltaTime: deltaTime)
        lastTime = currentTime
    }
}

これでnode1が右方向、node2が上方向に移動するようになりました。

f:id:llcc:20170322235811p:plain

entity1とentity2は下のupdateメソッドのように、片方のコンポーネントから別のコンポーネントのメソッドを呼び出す時に便利です。

class HorizontalComponent: GKComponent {
    let node: SKNode
    
    init(node: SKNode) {
        self.node = node
        
        super.init()
    }
    
    required init?(coder aDecoder: NSCoder) {
        fatalError("init(coder:) has not been implemented")
    }
    
    override func update(deltaTime seconds: TimeInterval) {
        node.position.x += 1
        entity?.components.flatMap { $0 as? VerticalComponent }.forEach { $0.update(deltaTime: seconds) }
    }
}

最後に、それぞれのnodeに「画面タップで回転」という性質を追加します。
「画面タップで回転」という性質を表すRotateComponentクラスを下のように作成します。

class RotateComponent: GKComponent {
    let node: SKNode
    
    init(node: SKNode) {
        self.node = node
        
        super.init()
    }
    
    required init?(coder aDecoder: NSCoder) {
        fatalError("init(coder:) has not been implemented")
    }
    
    func rotate() {
        node.run(SKAction.rotate(byAngle: 2, duration: 1))
    }
}

今作ったcomponentをnode1とnode2に反映します。

import SpriteKit
import GameplayKit

class GameScene: SKScene {
    let horizontalComponentSystem = GKComponentSystem(componentClass: HorizontalComponent.self)
    let verticalComponentSystem = GKComponentSystem(componentClass: VerticalComponent.self)
    let rotateComponentSystem = GKComponentSystem(componentClass: RotateComponent.self)
    var lastTime: TimeInterval = 0
    
    let node1 = SKSpriteNode(color: UIColor(red: 0.1, green: 0.8, blue: 0.8, alpha: 1), size: CGSize(width: 100, height: 100))
    let node2 = SKSpriteNode(color: UIColor(red: 0.8, green: 0.8, blue: 0.1, alpha: 1), size: CGSize(width: 100, height: 100))
    let entity1 = GKEntity()
    let entity2 = GKEntity()
    
    override func didMove(to view: SKView) {
        node1.position.x = -100
        node2.position.x =  100
        
        addChild(node1)
        addChild(node2)
        
        let horizontalComponent = HorizontalComponent(node: node1)
        entity1.addComponent(horizontalComponent)
        horizontalComponentSystem.addComponent(horizontalComponent)
        
        let verticalComponent = VerticalComponent(node: node2)
        entity2.addComponent(verticalComponent)
        verticalComponentSystem.addComponent(verticalComponent)
        
        // ここから今回追加
        let rotateComponent1 = RotateComponent(node: node1)
        let rotateComponent2 = RotateComponent(node: node2)
        entity1.addComponent(rotateComponent1)
        entity2.addComponent(rotateComponent2)
        rotateComponentSystem.addComponent(rotateComponent1)
        rotateComponentSystem.addComponent(rotateComponent2)
    }
    
    override func update(_ currentTime: TimeInterval) {
        if lastTime == 0 {
            lastTime = currentTime
        }
        let deltaTime = currentTime - lastTime
        horizontalComponentSystem.update(deltaTime: deltaTime)
        verticalComponentSystem.update(deltaTime: deltaTime)
        lastTime = currentTime
    }
    
    // ここから今回追加
    override func touchesEnded(_ touches: Set<UITouch>, with event: UIEvent?) {
        rotateComponentSystem.components.flatMap { $0 as? RotateComponent }.forEach {
            $0.rotate()
        }
    }
}

これで画面タップでnodeが回転するようになりました。

f:id:llcc:20170323001027p:plain

Storyboardの多言語対応

Storyboardの多言語対応を試してみました。

まずはプロジェクトに言語設定を追加します。
プロジェクト設定で言語を選択して下さい。

f:id:llcc:20170318155046p:plain

下のような画面になるので、多言語対応するStoryboardを選択します。

f:id:llcc:20170318155243p:plain

選択したStoryboardには、以下のように.stringsファイルが作られます。

f:id:llcc:20170318155321p:plain

次はStoryboardにラベルを配置します。

f:id:llcc:20170318160556p:plain

次は日本語用の.stringsファイルに先程配置したラベルの日本語表示を追加します。

f:id:llcc:20170318160654p:plain

上画像のBOM-ZI-JF1はラベルのObject-IDになります。
下画像の右下の箇所で確認する事ができます。

f:id:llcc:20170318160640p:plain

言語設定が英語の状態でアプリを起動すると下のようになります。

f:id:llcc:20170318161019p:plain

言語設定を日本語にしたら、以下のように切り替わってくれました。

f:id:llcc:20170318160929p:plain

UISegmentControlやUIButtonは下の方法で対応できました。

"BOM-ZI-JF1.text" = "テストラベル!!";
"2ee-nm-Qy8.segmentTitles[0]" = "セグメント1";
"2ee-nm-Qy8.segmentTitles[1]" = "セグメント2";
"w32-UA-4Oj.normalTitle" = "ボタン";

UIImageViewだけはStoryboardで対応する方法が見つからなかったため、コード上で対応する必要がありそうです。

SDWebImageライクなライブラリ、Kingfisherを使ってみる

Kingfisherというライブラリを使ってみました。
こちらはSDWebImageにインスパイアされて作ったもので、画像のダウンロードが簡単にできるものになっています。

github.com

インストール

いつものようにCocoapodsを使います。

target 'MyApp' do
  use_frameworks!

  pod 'Kingfisher'
end

使い方

以下のように画像の読み込みを行う事ができます。

import UIKit
import Kingfisher

class ViewController: UIViewController {
    override func viewDidLoad() {
        super.viewDidLoad()
        
        let v = UIImageView(frame: CGRect(x: 10, y: 10, width: 100, height: 100))
        v.kf.setImage(with: URL(string: "https://cdn-ak.f.st-hatena.com/images/fotolife/l/llcc/20151012/20151012161841.png"))
        view.addSubview(v)
    }
}

実行すると以下のように画像が表示されます。

f:id:llcc:20161226230153p:plain

setImageにはプレースホルダー画像、完了後のコールバックなどを渡す事ができます。

import UIKit
import Kingfisher

class ViewController: UIViewController {
    override func viewDidLoad() {
        super.viewDidLoad()
        
        let v = UIImageView(frame: CGRect(x: 10, y: 10, width: 100, height: 100))
        v.kf.setImage(with: URL(string: "https://cdn-ak.f.st-hatena.com/images/fotolife/l/llcc/20151012/20151012161841.png"), placeholder: #imageLiteral(resourceName: "placeholder"), options: nil, progressBlock: { receivedSize, totalSize in
        }, completionHandler: { image, error, cacheType, imageURL in
        })

        view.addSubview(v)
    }
}

オプションではキャッシュ方法やScaleなどを設定できます。
形式は、以下enumの配列になります。

public enum KingfisherOptionsInfoItem {
    case targetCache(ImageCache)
    case downloader(ImageDownloader)
    case transition(ImageTransition)
    case downloadPriority(Float)
    case forceRefresh
    case forceTransition
    case cacheMemoryOnly
    case onlyFromCache
    case backgroundDecode
    case callbackDispatchQueue(DispatchQueue?)
    case scaleFactor(CGFloat)
    case preloadAllGIFData
    case requestModifier(ImageDownloadRequestModifier)
    case processor(ImageProcessor)
    case cacheSerializer(CacheSerializer)
    case keepCurrentImageWhileLoading
}

setImageにはUIButtonにも追加されています。
こちらは引数にUIControlStateを渡す必要があります。

import UIKit
import Kingfisher

class ViewController: UIViewController {
    override func viewDidLoad() {
        super.viewDidLoad()
        
        let b = UIButton(frame: CGRect(x: 10, y: 10, width: 100, height: 100))
        b.kf.setImage(with: URL(string: "https://cdn-ak.f.st-hatena.com/images/fotolife/l/llcc/20151012/20151012161841.png"), for: .normal, placeholder: #imageLiteral(resourceName: "placeholder"), options: nil, progressBlock: { receivedSize, totalSize in
        }, completionHandler: { image, error, cacheType, imageURL in
        })

        view.addSubview(b)
    }
}

【fastlane】1プロジェクトに複数アプリの入っている場合のメタデータ管理

1つのプロジェクトで複数アプリをリリースしている場合のメタデータ管理方法です。
複数アプリが全く同じメタデータならいいのですが、アイコンやスクリーンショットを別々にする場合少し工夫をする必要があります。

fastlaneの設定方法はこちらをご参照下さい。

www.cl9.info

複数アプリ対応

まずは1アプリに対応します。
プロジェクトのルートで以下コマンドを実行します。

fastlane init

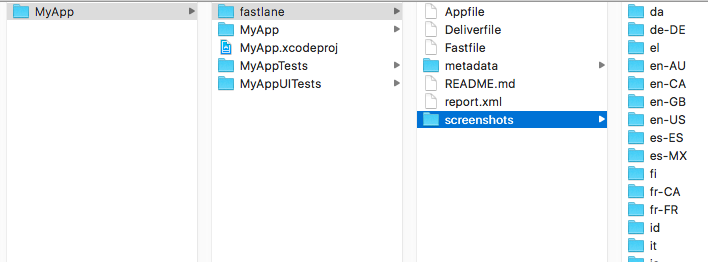
アプリのメタデータが以下のような構成でダウンロードされます。

f:id:llcc:20161225203212p:plain

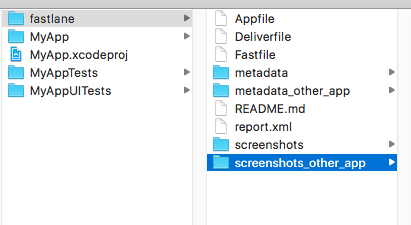
2つ目以降のアプリは以下のように別フォルダを指定してダウンロードします。

fastlane deliver download_screenshots --app_identifier com.example.other  --screenshots_path fastlane/screenshots_other_app
fastlane deliver download_metadata --app_identifier com.example.other  --metadata_path fastlane/metadata_other_app

これで別アプリのメタデータがフォルダに保存されます。

f:id:llcc:20161225203757p:plain

別アプリへのメタデータのアップロードは以下のようにオプション付ける事で実現できます。

fastlane deliver --app_identifier com.example.other  --screenshots_path fastlane/screenshots_other_app --metadata_path fastlane/metadata_other_app

上コマンドはFastfileに登録しておけば簡単に実行できるようになります。

fastlane update_metadata_other_app 
platform :ios do
  lane :update_metadata_other_app do
    deliver(
      app_identifier: 'com.example',
      screenshots_path: 'fastlane/screenshots_other_app',
      metadata_path: 'fastlane/metadata_other_app',
    )
  end
end

InAppPurchase用ライブラリ、RMStoreを使ってみる

RMStoreというiPhoneのアプリ内課金を楽にしてくれるライブラリを使ってみました。

github.com

インストール

インストールはcocoapodsを使います。

pod 'RMStore'

使い方

商品情報は以下のように取得します。
引数にproductIdを渡せばSKProductの配列が返ってきます。

let productIds = ["com.example.item"]
RMStore.default().requestProducts(productIds, success: { products, invalidIdentifiers in
    self?.products = products as? [SKProduct]
}, failure: { error in
})

購入処理はaddPaymentメソッドを使います。
レシートチェックなどは引数で渡されるSKPaymentTransactionクラスのインスタンスを使います。

RMStore.default().addPayment("com.example.item", success: { transaction in
        if transaction?.transactionState != .purchased {
            return
        }
    }, failure: { transaction, error in
})

リストア処理は以下の通りです。
購入履歴が引数として渡されるので、それを使って購入したかの判定をします。

RMStore.default().restoreTransactions(onSuccess: { [weak self] transactions in
        if let transactions = (transactions as? [SKPaymentTransaction]), transactions.map({ $0.payment.productIdentifier }).contains("com.example.com") {
            print("商品情報がありました")
        } else {
            print("商品情報が見つかりませんでした")
        }
    }, failure: { error in
})

今回は試していないのですが、コンテンツダウンロードも対応しているようです。

【iOS】iTunesConnectのSalesデータ取得プログラムを動かす【新方式に対応】

iTunesConnectの売上やダウンロード数などのデータを取得するプログラムに関する話です。

今まではiTunesConnectのSalesデータをAutoIngestion Toolというものを使って取得できました。
しかしこのツールは非推奨になり、2016年12月で停止してしました。
AppleからはReporterというツールを使うよう通知があったので今回はそれを試してみました。

ダウンロード

ダウンロードは下ページのSetupにあるダウンロードリンクから行います。

Reporter User Guide

ダウンロードすると、Reporter.jarReporter.propertiesの2つのファイルが入っています。
Reporter.jarが実際にデータを取得するプログラムで、Reporter.propertiesはユーザー情報を書くファイルです。

f:id:llcc:20161223191603p:plain

Salesデータの取得方法

まずは認証情報を記入します。
Reporter.propertiesを開くと以下のようになっているので、userIDとpasswordを埋めます。

userID = 
password = 

Mode=Robot.xml

SalesUrl=https://reportingitc-reporter.apple.com/reportservice/sales/v1
FinanceUrl=https://reportingitc-reporter.apple.com/reportservice/finance/v1

入力が終わったらReporter.jarを使ってSalesデータを取得します。

java -jar Reporter.jar p=Reporter.properties Sales.getReport [vendor id], Sales, Summary, Daily, 20161201

vendor idは以下コマンドで取得する事ができます。

java -jar Reporter.jar p=[properties file] Sales.getVendors

コマンドは以下のようなXML返します。

<?xml version="1.0" encoding="UTF-8" standalone="yes"?>
<Output>
    <Message>Successfully downloaded xxxxxxx.txt.gz</Message>
</Output>

xxxxxxx.txt.gzファイルには各アプリのダウンロード数などのデータが入っています。
形式は以下のように1行1アプリ、各要素タブ区切りになります。

Provider Provider Country    SKU Developer   Title   Version Product Type Identifier Units   Developer Proceeds  Begin Date  End Date    Customer Currency   Country Code    Currency of Proceeds    Apple Identifier    Customer Price  Promo Code  Parent Identifier   Subscription    Period  Category    CMB Device  Supported Platforms Proceeds Reason Preserved Pricing   Client
APPLE   US  com.example developername   appname 1.0 0   0   0   12/16/2016  12/16/2016  JPY JP  JPY 123456789   0                   Business        iPhone  iOS